A user reported they could not see the ‘New’ button on the command bar to create new bulk record deletion job in Dynamics. Google tells me that the Bulk Delete privilege is required to enable this button. I had a look at the user’s security role and this privilege is already granted.
It turns out that another set of privileges is also required, which is read/write on the System Job entity. This makes sense as bulk record deletion is implemented as an async job in CRM.
So, in order to create bulk record deletion jobs, the following privileges would be required (use the search filter to find them in the new role editor interface, otherwise I have noted below where they can be found in the old interface):
Bulk Delete (found in the Core Records tab, under the Miscellaneous Privileges section in the old interface)
System Job entity (found in the Customization tab in the old interface), I’d would suggest User access level/privilege depth for the following:
Create
Read
Write
Append
Append To
Enabling the bulk record deletion forms for security role
By default, only users with roles System Administrator or System Customizer are able to create bulk record deletion jobs. If you want to extend this capability to other roles, then there are two things you need to do:
Grant the role with privileges as outlined above, and
Enable the forms of the Bulk Delete Operation entity for the role.
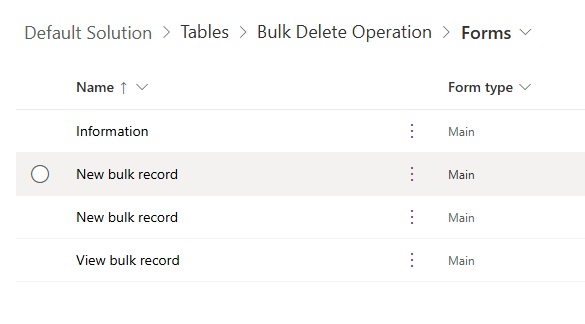
Out of the box, the Bulk Delete Operation entity has 4 forms as shown below (yes, there are 2 ‘New bulk record‘ forms and I don’t know why).
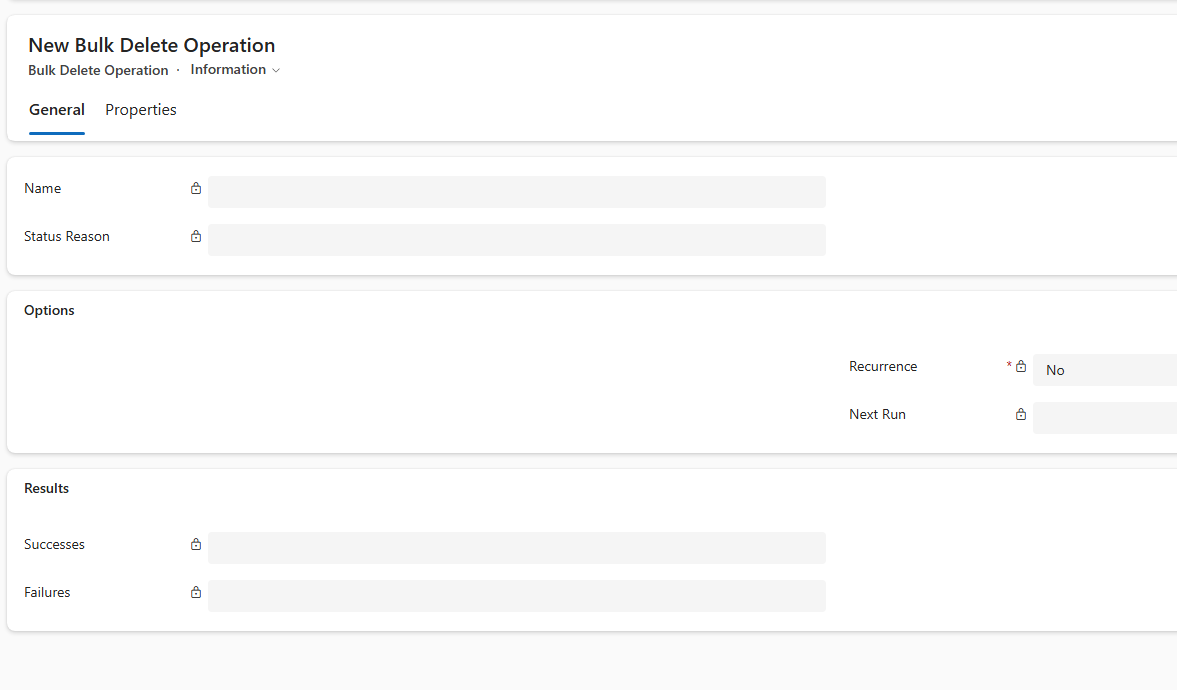
Only the ‘Information‘ form is available to everyone by default. The other 3 forms are enabled only for System Administrator and System Customizer roles. The ‘Information‘ form (shown below) however does not have the controls that allow you to define the criteria for selecting the records to be deleted.
If you do not enable the other 3 forms for your target role, then users of that role would get the ‘Information‘ form by default, and effectively unable to properly define a bulk record deletion job.
So, to ensure that your target role can create bulk record deletion jobs, enable the 2 ‘New bulk record‘ forms and the ‘View bulk record‘ for that role.
In Dynamics 365, packaging and promoting email templates across environments are not difficult since this component type is solution aware. The problem however is that these templates can sometime contain bits that are environment-specific, e.g. URLs, and there isn’t a way to deal with this OOTB.
For example, let say you have a ‘Welcome’ email template that is sent to new customers. In this email there is a sign-up link to your Customer Portal. In TEST, you’d want the link to point to the TEST instance of the Portal; and in PROD, you’d want it to point to the PROD instance.
I recently solved this by executing a PowerShell script after each time the email templates are deployed. Using a config file, the script looks through the content of each email template and performs a series of string replacements to update the URLs to suit the target environment (e.g. replace https://customer-portal-dev.com with https://customer-portal-test.com for TEST, and with https://customer-portal.com for PROD). This script is added to the DevOps release pipeline, and therefore eliminates the need for any manual post-deployment tasks for email templates.
This config file defines a list of tokens to be replaced, and the values to be replaced with for each environment. In the above example, only one token is defined: customer-portal-dev.com, which should be replaced with:
customer-portal-test.com – when the target environment is test
customer-portal.com – when the target environment is prod
The script expects this setting file to be named settings.json and be located in the same folder.
The script
param
(
    [Parameter(Mandatory)]
	[string] $Environment
)

Function GetEmailTemplatesToUpdate()
{
    $emailTemplates = Get-CrmRecords -EntityLogicalName "template" -FilterAttribute "title" -FilterOperator "like" -FilterValue "BNH%" -Fields "title", "presentationxml", "body", "safehtml"

    WriteInfo "Found $($emailTemplates.Count) email template(s)"

    return $emailTemplates.CrmRecords
}

Function ProcessEmailTemplates([System.Collections.Generic.List[Object]] $emailTemplates, [string] $environmentName)
{
    Foreach ($template in $emailTemplates)
    {
        Try
        {
            WriteInfo "Processing '$($template.title)'"

            $presentationXml = $template.presentationxml
            $safeHtml = $template.safehtml
            $body = $template.body

            $tokenFound = $false

            Foreach ($replaceValue in $Script:_settings.replaceValues)
            {
                $matchingReplaceWithForEnvironment = $replaceValue.replaceWith | ? {$_.environment -eq $environmentName}

                If ($matchingReplaceWithForEnvironment -ne $null)
                {
                    ##PowerShell 5 does not have an overload for String.Contains() that accepts StringComparison so we are using IndexOf instead.
                    ##PowerShell 5 also does not have an overload for String.Replace() that accepts StringComparison. This means the replace will be CASE-SENSITIVE.

                    If ($presentationXml.IndexOf($replaceValue.find, [System.StringComparison]::InvariantCultureIgnoreCase) -ne -1)
                    {
                        $tokenFound = $true

                        WriteInfo "--- Found token '$($replaceValue.find)' in field 'presentationxml'. Replacing with '$($matchingReplaceWithForEnvironment.value)'..."
                        $presentationXml = $presentationXml.Replace($replaceValue.find, $matchingReplaceWithForEnvironment.value)
                    }

                    If ($safeHtml.IndexOf($replaceValue.find, [System.StringComparison]::InvariantCultureIgnoreCase) -ne -1)
                    {
                        $tokenFound = $true

                        WriteInfo "--- Found token '$($replaceValue.find)' in field 'safehtml'. Replacing with '$($matchingReplaceWithForEnvironment.value)'..."
                        $safeHtml = $safeHtml.Replace($replaceValue.find, $matchingReplaceWithForEnvironment.value)
                    }

                    If ($body.IndexOf($replaceValue.find, [System.StringComparison]::InvariantCultureIgnoreCase) -ne -1)
                    {
                        $tokenFound = $true

                        WriteInfo "--- Found token '$($replaceValue.find)' in field 'body'. Replacing with '$($matchingReplaceWithForEnvironment.value)'..."
                        $body = $body.Replace($replaceValue.find, $matchingReplaceWithForEnvironment.value)
                    }
                }
            }

            If ($tokenFound)
            {
                Set-CrmRecord -EntityLogicalName "template" -Id $template.templateid -Fields @{"presentationxml"=$presentationXml; "safehtml"=$safeHtml; "body"=$body}
            }
            Else
            {
                WriteWarning "Did not find any tokens to replace. This template will not be updated."
            }
        }
        Catch
        {
            WriteError "An error has occurred while processing the template '$($template.title)': $_`n`n$($_.ScriptStackTrace)"
        }
    }
}

Function ValidateSettingsForEnvironment([string] $environmentName)
{
    Foreach ($replaceValue in $Script:_settings.replaceValues)
    {
        $foundReplaceWithForEnvironment = $false

        Foreach ($replaceWith in $replaceValue.replaceWith)
        {
            If ($replaceWith.environment -eq $environmentName)
            {
                $foundReplaceWithForEnvironment = $true
                Break
            }
        }

        If (-not $foundReplaceWithForEnvironment)
        {
            WriteWarning "A replace value is not specified for the token '$($replaceValue.find)' for environment '$environmentName'. This token will not be replaced."
        }
    }
}

Function WriteInfo([string] $message, [string] $foregroundColor = "white")
{
    Write-Host $message -ForegroundColor $foregroundColor
}

Function WriteWarning([string] $message)
{
    Write-Host "WARNING: $message" -ForegroundColor Yellow
}

Function WriteError([string] $message)
{
    Write-Host $message -ForegroundColor Red
}

Function WriteBlankLine()
{
    Write-Host "`n"
}


###Main
$ErrorActionPreference = "Stop"

Install-Module Microsoft.Xrm.Data.PowerShell -Scope CurrentUser

WriteBlankLine

$Script:_settings = Get-Content "settings.json" -Raw | ConvertFrom-Json

ValidateSettingsForEnvironment $Environment

$emailTemplates = GetEmailTemplatesToUpdate
ProcessEmailTemplates $emailTemplates $Environment
The script requires one parameter: Environment, which is the target environment and should match one of the environments identified in the config file.
By design, the script only processes specific email templates. This is defined in the GetEmailTemplatesToUpdate function. As written here, it is only processing those templates where title begins with BNH.
IMPORTANT: You will need to update the filtering in the above function to suit your need.
What about the connection to CRM??
You may notice that there is no code to make connection to CRM in the above script. This is because we will make the connection in the DevOps pipeline instead. This will allow us to manage the connection details such as client ID and secret more securely.
The way the Microsoft.Xrm.Data.PowerShell module works, if a connection is not passed when calling Get-CrmRecords or Set-CrmRecord, then it will automatically search for a connection in the current context. This connection will be established by the DevOps pipeline prior to invoking our script.
The build pipeline
Here is the build pipeline:
This pipeline simply exports the CRM solution containing the email templates and publishes that as an artefact. It also publishes a second artefact, which is our script to update the email templates post deployment. Note that the script expects the config file to be in the same location as the script. You therefore should place the script and the config file in the same folder in the repo and publish that folder as an artefact.
The release pipeline
Here is the release pipeline with TEST and PROD configured:
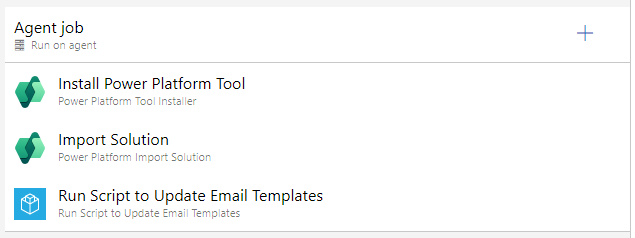
PROD is an exact clone of TEST. Below are the tasks defined for a stage (or environment):
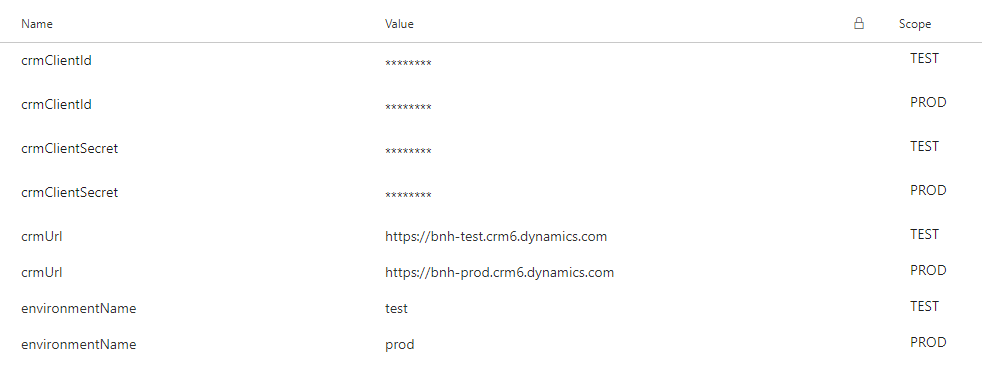
The last task above, Run Scripts to Update Email Templates, is actually defined as a task group so that we can avoid code duplication and reuse it easily across different stages (or environments). We will look at the config for this task group soon, but for now, here are the parameters it requires:
crmClientId, crmClientSecret and crmUrl are used to make connection to the target CRM. environmentName should be one of the environments identified in our config file.
The values for these parameters are defined at the pipeline level and are scoped to each stage. This allows us to clone a stage without needing to update the task that runs our script.
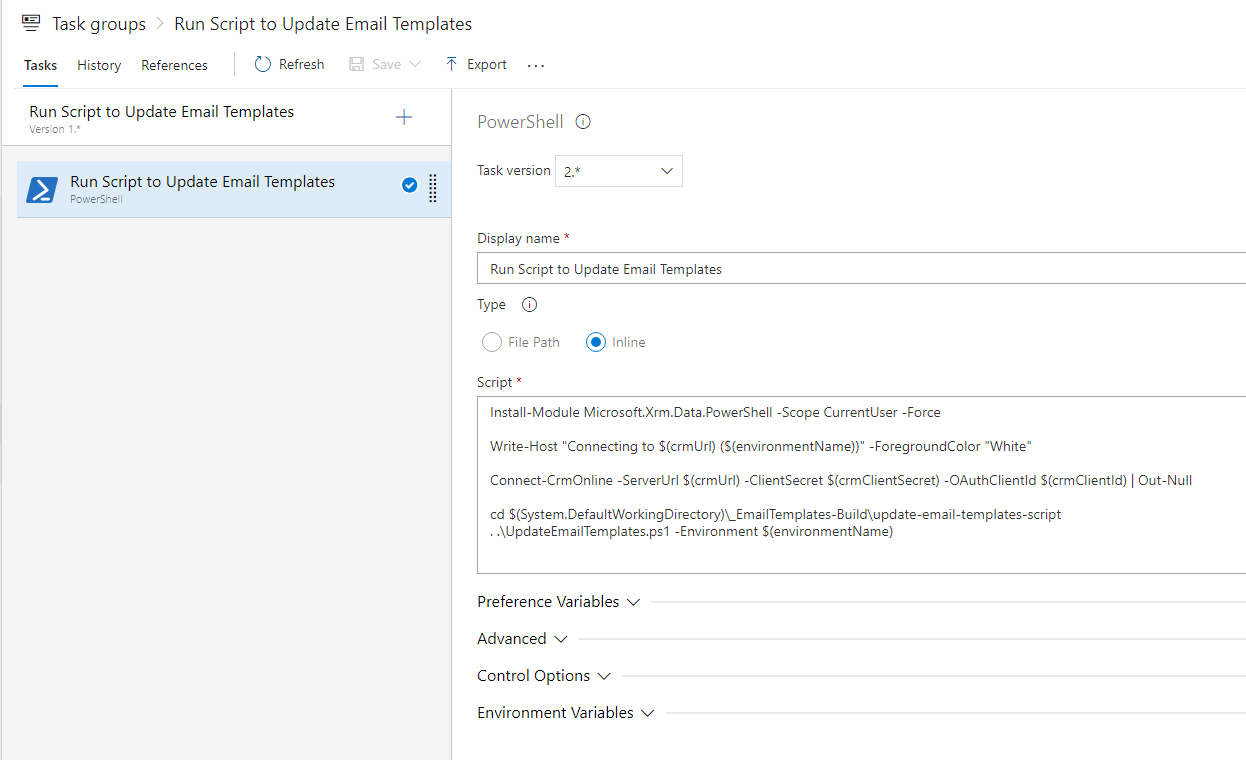
Here is the config for that Run Scripts to Update Email Templates task group:
It has one single task that runs a PowerShell script, which connects to CRM and invokes our script to update the email templates.
The second last line of the above script contains the location to where our script was published and downloaded as a build artefact. You may need to update this to suit your scenario.
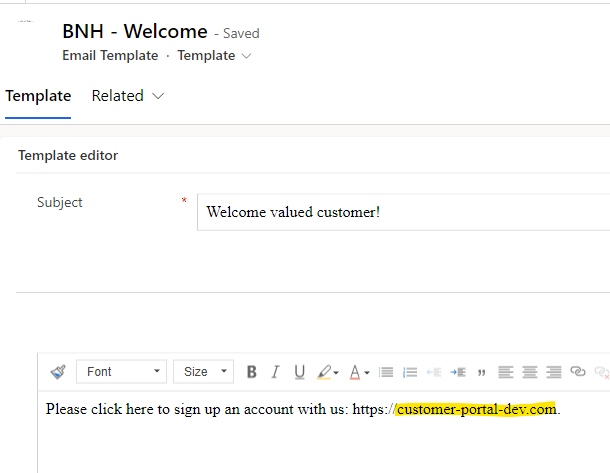
The email template
And for the sake of completeness, here’s my overly simple email template in DEV:
Here’s the same template deployed to PROD:
And there you have it…
With a simple script and config file (and a right DevOps pipeline) you can eliminate post-deployment tasks often associated with email templates and their environment-specific content.
So you have a PowerPages (PowerApps Portal) website. A website user reports a problem with the data they are seeing, but you are unable to reproduce it using your login account. Wouldn’t it be nice if you could login as this particular user and observe the problem first hand?
Well, if you have access to the backend CRM and if your portal is using an external ID provider (such as Azure B2C, Google, Facebook, etc.) then this can be done fairly easily. I will outline the steps below in this post.
Important: Do this for troubleshooting purposes only, and remember to revert the changes once done.
Overview of how it works
Every user that logins to your portal has a corresponding Contact record in CRM. When an external ID provider is configured for your portal, the usernames and passwords of users are held in that ID provider. At a high level, the following occurs when a user signs in to your portal:
User provides username and password at the ID provider’s login page
ID provider authenticates the user and establishes their identity
This identity is passed to CRM
CRM resolves the identity to a Contact record
This Contact record represents the logged in user in your portal
In step 4 above CRM uses the External Identity entity to resolve the incoming identity to a Contact record. There is a 1:N relationship from Contact to External Identity, and an External Identity record looks something like this:
The Username and Identity Provider fields are used to locate the matching Contact record for the incoming identity.
In order to impersonate a user, we will temporarily create an additional External Identity record for that user, but use the Username from the External Identity record of our own portal user. This will allow us to login with our own username and password at the external ID provider, but have CRM resolves our portal user context to the one we want to impersonate.
The steps
So, with the above knowledge, the steps to achieve what we want would be:
Locate the Contact record for your own portal user (not the user you want to impersonate)
Go to the related External Identity record for the above Contact
Copy its Username value
Copy its Identity Provider value
Append “-OLD” to the Username field and save the record. This stops CRM from resolving to our normal Contact record when we login with our username and password.
Locate the Contact record for the user you want to impersonate
Go to the sub-grid of related External Identity records for the above Contact
Add a new External Identity record for the above contact
Paste in the Username and Identity Provider values you copied from step 3 and 4
Login to your portal with your normal username and password. You should be signed in as the user you want to impersonate.
It is perfectly valid for a Contact record to have multiple External Identity records. Since we have added a new External Identity record to that Contact record, both you and that user can login using your own respective username and password and be resolved to the same user context. This means that you can perform your troubleshooting without disrupting the user.
I hope this will come in handy for you at some point, and remember: do this for troubleshooting purposes only, and don’t forget to revert the changes once done.
Due to limitations of OOTB Power Apps Portal, a common requirement is to have a custom HTTP service that you can invoke by JavaScript on a Portal page, which performs some complex processing or querying to provide a custom user experience. More often than not, there are two key security requirements for this service:
It should be accessible only to authenticated Portal users
The current Portal user context (e.g. ID) should be passed securely to the service
In this post I will outline the architecture, steps and codes to implement such a service on Azure Function.
Architecture overview
In short, we will be using an OAuth token to authenticate the user at the service end. This token will also contain key information about the calling user, such as ID and email address. The JS on our Portal page will acquire this token, and pass it to the service via a request header when making the service call.
One common assumption is that since you can secure both the Portal and the service against a common authentication provider (e.g. Azure B2C), you therefore should be able to configure SSO between the Portal and the service using the token from that provider. Unfortunately however, this assumption is not true.
In reality, the user token you retrieve from Portal (after user has authenticated) is not the same token (from B2C for example) that the user used to sign-in to Portal. Instead, Portal creates a new token, signs it with its key and returns that to you. Using the config options in Azure Portal alone, we cannot configure the Azure Function App to authenticate against this token from Portal. We will need custom code to do this, and our code will need to validate the Portal token.
Service uses Portal’s public key to validate Bearer token and rejects request if token is invalid.
If token is valid, service extracts user information from the token and makes it available to the rest of our service logic.
Key design decision #1: Perform authorisation as part of request pipeline (middleware)
Our function app is likely to contain multiple functions (endpoints) and they are likely to all require authentication and user context. We will implement the authorisation as part of the request pipeline. This will ensure that all functions are automatically protected (and have access to user context information) without us needing to implement anything special (such as a base class) for each function.
We will use middleware (similar to ASP.NET Core) to inject our authorisation code into the request pipeline. Middleware requires our function app to run under .NET 5 or .NET 6, and also in isolated process (aka out-of-process) in Azure. You can read more about in-process vs isolated here.
Side note: There is an obsolete feature, namely IFunctionInvocationFilter, that allows you to run code on invocation of each function. This feature has been in preview for many years (since 2019?), and appears will not be taken forward by Microsoft. Middleware is the recommended way for injecting custom logic into the request pipeline.
Key design decision #2: Retrieve Portal’s public key live
Portal’s authentication key, including its public key, expire every two years and must be manually renewed. In our custom service, we will retrieve the Portal’s public key live (instead of storing it into config). This will save us from having to update our service config each time the Portal’s public key changes. And beside, the key is not a single piece of string, which makes updating the config value for it on the Azure Portal quite awkward.
Key code components
Our function app will contain the following key classes:
PortalPublicKeyProvider: This service is responsible for retrieving the public key of the target Portal. The URL of the target Portal will be stored in configuration of the function app.
AuthorizationMiddleware: This is the middleware class that will perform the validation of the Bearer token. It will also extract user information from the token and make them available (via the UserInfoProvider class) to the rest of our function logic.
UserInfoProvider: This class is the “vessel” for passing authorised user information from our middleware to the rest of our function logic.
Show me the code!
OK! Let’s look at some code! But first, some notes about creating your function app project:
Choose .NET 6.0 Isolated (Long-term support) as the functions worker. This is required for using middleware in our code.
Choose Http trigger as the function type.
Choose Function as the authorization level. This will require the calling code to provide a known function key (configured in Azure Portal) when invoking a function. This adds an additional layer of security to our service, but it is optional.
Below is a screenshot from Visual Studio 2022. If you are missing some options, then please try updating your Visual Studio to the latest update.
PortalPublicKeyProvider
The first class we will implement is PortalPublicKeyProvider. This class will act as a service and will be responsible for retrieving the public key of the target Portal. This class will read the URL of the target Portal from the function app’s configuration.
Add the interface and class below and review the inline comments. You will also need to install the following packages:
Microsoft.IdentityModel.Tokens
BouncyCastle
using Microsoft.IdentityModel.Tokens;
using Org.BouncyCastle.Crypto.Parameters;
using Org.BouncyCastle.OpenSsl;
using System;
using System.IO;
using System.Net.Http;
using System.Security.Cryptography;
using System.Threading.Tasks;

namespace BNHPortalServices
{
	internal interface IPortalPublicKeyProvider
	{
		Task<RsaSecurityKey> GetPortalPublicKeyAsync();
	}

	/// <summary>
	/// This service queries the target Portal and retrieves its public key. This service caches the key after the initial request, and therefore should be
	/// registered as a singleton.
	///
	/// This service reads the URL of the target Portal using the app configuration key 'PortalUrl'.
	/// </summary>
	internal class PortalPublicKeyProvider : IPortalPublicKeyProvider
	{
		//Most of the code below is from https://github.com/microsoft/PowerApps-Samples/blob/1adb4891a312555a2c36cfe7b99c0a225a934a0d/portals/ExternalWebApiConsumingPortalOAuthTokenSample/ExternalWebApiConsumingPortalOAuthTokenSample/App_Start/Startup.cs
		//with some refactoring.

		private RsaSecurityKey _portalPublicKey;

		public async Task<RsaSecurityKey> GetPortalPublicKeyAsync()
		{
			if (_portalPublicKey == null)
			{
				//Query the target Portal and retrieve its public key as plain text, and then return it as a RsaSecurityKey - which is required
				//for validating the Bearer token.

				var publicKeyAsText = await GetPortalPublicKeyAsTextAsync();

				var pemReader = new PemReader(new StringReader(publicKeyAsText));
				var keyParameters = (RsaKeyParameters)pemReader.ReadObject();

				var rsaParameters = new RSAParameters
				{
					Modulus = keyParameters.Modulus.ToByteArrayUnsigned(),
					Exponent = keyParameters.Exponent.ToByteArrayUnsigned()
				};

				var rsaCryptoServiceProvider = new RSACryptoServiceProvider();
				rsaCryptoServiceProvider.ImportParameters(rsaParameters);

				_portalPublicKey = new RsaSecurityKey(rsaCryptoServiceProvider);
			}

			return _portalPublicKey;
		}

		private async Task<string> GetPortalPublicKeyAsTextAsync()
		{
			var portalPublicKeyUrl = $"{Environment.GetEnvironmentVariable("PortalUrl")}/_services/auth/publickey";

			var httpClient = new HttpClient();
			return await httpClient.GetStringAsync(portalPublicKeyUrl);
		}
	}
}
Now we need to register this class with the Dependency Injection framework so that we can access it from our authorisation middleware. The PortalPublicKeyProvider service caches the Portal’s key after the initial request. We therefore will register this service as a singleton.
Update the Program.cs file to be as follow and review the inline comments.
using Microsoft.Extensions.DependencyInjection;
using Microsoft.Extensions.Hosting;

namespace BNHPortalServices
{
	public class Program
	{
		public static void Main()
		{
			var host = new HostBuilder()
				//Register our services with the DI framework
				.ConfigureServices(services =>
				{
					services.AddSingleton<IPortalPublicKeyProvider, PortalPublicKeyProvider>();
				})
				.ConfigureFunctionsWorkerDefaults()
				.Build();

			host.Run();
		}
	}
}
App configuration setting
Our function app will require one configuration setting, which is the URL of the target Portal. This setting, namely PortalUrl, is used by the PortalPublicKeyProvider class above.
Update the local.settings.json to be as below. Remember to add the same setting via the Azure Portal once your function app is deployed to Azure.
Next we will implement the UserInfoProvider class, which is a simple “vessel” for our authorisation middleware to set the user information (once the user has been authorised), and for the rest of our function logic to pull those information back out.
We will also implement a class, namely UserInfo, to represent a set of information about a user. This class also acts as a mapper that maps specific claims in a given token to specific bits of user information. In this example we will map the user ID and email address.
Add the UserInfo class as below. Note that you will need to install the System.IdentityModel.Tokens.Jwt package.
using System;
using System.IdentityModel.Tokens.Jwt;
using System.Linq;

namespace BNHPortalServices
{
	public class UserInfo
	{
		public Guid UserId { get; private set; }
		public string Email { get; private set; }

		public UserInfo(JwtSecurityToken userToken)
		{
			UserId = Guid.Parse(userToken.Subject);
			Email = userToken.Claims.FirstOrDefault(c => c.Type == "email")?.Value;
		}
	}
}
Now add the interface and class below for the UserInfoProvider class.
namespace BNHPortalServices
{
	public interface IUserInfoProvider
	{
		public UserInfo UserInfo { get; set; }
	}

	internal class UserInfoProvider : IUserInfoProvider
	{
		public UserInfo UserInfo { get; set; }
	}
}
Now we need to register the UserInfoProvider class with the Dependency Injection framework so that we can access it from our authorisation middleware as well as our function logic. We will register this class using the AddScoped method so that a single instance of this class can be reused multiple times within the same request.
Update the Program.cs file to be as follow and review the inline comments.
using Microsoft.Extensions.DependencyInjection;
using Microsoft.Extensions.Hosting;

namespace BNHPortalServices
{
	public class Program
	{
		public static void Main()
		{
			var host = new HostBuilder()
				//Register our services with the DI framework
				.ConfigureServices(services =>
				{
					services.AddSingleton<IPortalPublicKeyProvider, PortalPublicKeyProvider>();
					services.AddScoped<IUserInfoProvider, UserInfoProvider>();
				})
				.ConfigureFunctionsWorkerDefaults()
				.Build();

			host.Run();
		}
	}
}
AuthorizationMiddleware
Next we will implement our authorisation middleware. This class will extract the Bearer token and validate it against the target Portal’s public key. If the token is valid, it will extract user information from the token and make them available to the rest of our function logic. Else, it will set the response of the request to 401 Unauthorized.
Add the AuthorizationMiddleware class as below and review the inline comments. Note that the code requires at least version 1.8.0-preview1 of the package Microsoft.Azure.Functions.Worker. You may need to update this package to this version or higher as the project template in Visual Studio uses a lower version by default.
using Microsoft.Azure.Functions.Worker;
using Microsoft.Azure.Functions.Worker.Http;
using Microsoft.Azure.Functions.Worker.Middleware;
using Microsoft.Extensions.DependencyInjection;
using Microsoft.Extensions.Logging;
using Microsoft.IdentityModel.Tokens;
using System;
using System.Collections.Generic;
using System.IdentityModel.Tokens.Jwt;
using System.Net;
using System.Net.Http.Headers;
using System.Text.Json;
using System.Threading.Tasks;

namespace BNHPortalServices
{
	internal class AuthorizationMiddleware : IFunctionsWorkerMiddleware
	{
		private ILogger _logger;

		public async Task Invoke(FunctionContext context, FunctionExecutionDelegate next)
		{
			_logger = context.GetLogger<AuthorizationMiddleware>();

			//Process the Authorization header if it is presents. Else, set response status to be 401.
			if (context.BindingContext.BindingData.ContainsKey("Headers"))
			{
				var headers = JsonSerializer.Deserialize<Dictionary<string, string>>((string)context.BindingContext.BindingData["Headers"]);

				if (headers.ContainsKey("Authorization"))
				{
					//Extract the Bearer token
					var authorization = AuthenticationHeaderValue.Parse(headers["Authorization"]);
					var bearerToken = authorization.Parameter;

					//Get the PortalPublicKeyProvider service to retrieve the Portal's public key
					var portalKeyProvider = context.InstanceServices.GetRequiredService<IPortalPublicKeyProvider>();

					var validationParameters = new TokenValidationParameters
					{
						IssuerSigningKey = await portalKeyProvider.GetPortalPublicKeyAsync(),

						//We are setting this to false here because by default the user token returned by Portal does not contain an
						//audience value. You can change this behaviour by registering a client ID using the
						//ImplicitGrantFlow/RegisteredClientId Site Setting in Portal. Read here for more
						//details: https://docs.microsoft.com/en-us/power-apps/maker/portals/oauth-implicit-grant-flow#register-client-id-for-implicit-grant-flow.
						ValidateAudience = false,

						//We are setting this to false as we are already validating the signing key.
						ValidateIssuer = false
					};

					try
					{
						//The ValidateToken method throws an exception if the token is invalid. We therefore will set the response
						//status to 401 on exception.
						new JwtSecurityTokenHandler().ValidateToken(bearerToken, validationParameters, out SecurityToken validatedToken);

						//Token is valid - extract user info and store it using our "vessel", the UserInfoProvider service.
						//Our function logic will use the UserInfoProvider service to pull back out the user
						//information when needed.
						var userInfo = new UserInfo(validatedToken as JwtSecurityToken);
						var userInfoProvider = context.InstanceServices.GetRequiredService<IUserInfoProvider>();

						userInfoProvider.UserInfo = userInfo;
					}
					catch (Exception e)
					{
						await SetUnauthorizedResponse(context, e.Message);
						return;
					}

					await next(context);
				}
				else
				{
					await SetUnauthorizedResponse(context, "Authorization header not found.");
				}
			}
			else
			{
				await SetUnauthorizedResponse(context, "Authorization header not found.");
			}
		}

		private async Task SetUnauthorizedResponse(FunctionContext context, string message)
		{
			_logger.LogWarning($"Authorization failed: {message}");

			//IMPORTANT: The calls to context.GetHttpRequestDataAsync() and context.GetInvocationResult() require
			//at least version 1.8.0-preview1 of the package Microsoft.Azure.Functions.Worker.
			var httpRequestData = await context.GetHttpRequestDataAsync();
			var response = httpRequestData.CreateResponse();

			response.StatusCode = HttpStatusCode.Unauthorized;
			await response.WriteStringAsync(message);

			context.GetInvocationResult().Value = response;
		}
	}
}
Now we need to tell our app to use our authorisation middleware. Update the Program.cs file to be as below and review the inline comments.
using Microsoft.Extensions.DependencyInjection;
using Microsoft.Extensions.Hosting;

namespace BNHPortalServices
{
	public class Program
	{
		public static void Main()
		{
			var host = new HostBuilder()
				//Register our services with the DI framework
				.ConfigureServices(services =>
				{
					services.AddSingleton<IPortalPublicKeyProvider, PortalPublicKeyProvider>();
					services.AddScoped<IUserInfoProvider, UserInfoProvider>();
				})

				//Register our middleware
				.ConfigureFunctionsWorkerDefaults(workerApplicationBuilder =>
				{
					workerApplicationBuilder.UseMiddleware<AuthorizationMiddleware>();
				})
				.Build();

			host.Run();
		}
	}
}
A sample function endpoint
The above are all the code that are required to secure your function app and provide it with information about the user context. Now let’s build a simple HelloWorld endpoint to test it.
Add the following class and review the inline comments. This is a simple GET HelloWorld function that returns the calling user’s ID and email address.
using System.Net;
using Microsoft.Azure.Functions.Worker;
using Microsoft.Azure.Functions.Worker.Http;
using Microsoft.Extensions.Logging;

namespace BNHPortalServices
{
    public class HelloWorld
    {
        private readonly ILogger _logger;
        private readonly IUserInfoProvider _userInfoProvider;

        //Inject the UserInfoProvider service into this class so we can access the user information.
        public HelloWorld(ILoggerFactory loggerFactory, IUserInfoProvider userInfoProvider)
        {
            _logger = loggerFactory.CreateLogger<HelloWorld>();
            _userInfoProvider = userInfoProvider;
        }

        [Function("HelloWorld")]
        public HttpResponseData Run([HttpTrigger(AuthorizationLevel.Function, "get")] HttpRequestData request)
        {
            _logger.LogInformation("C# HTTP trigger function processed a request.");

            var response = request.CreateResponse(HttpStatusCode.OK);
            response.Headers.Add("Content-Type", "text/plain; charset=utf-8");

            //Access information of the current user
            var userInfo = _userInfoProvider.UserInfo;

            response.WriteString($"Hello. You are {userInfo.UserId} with email address {userInfo.Email}.");

            return response;
        }
    }
}
Testing our function app
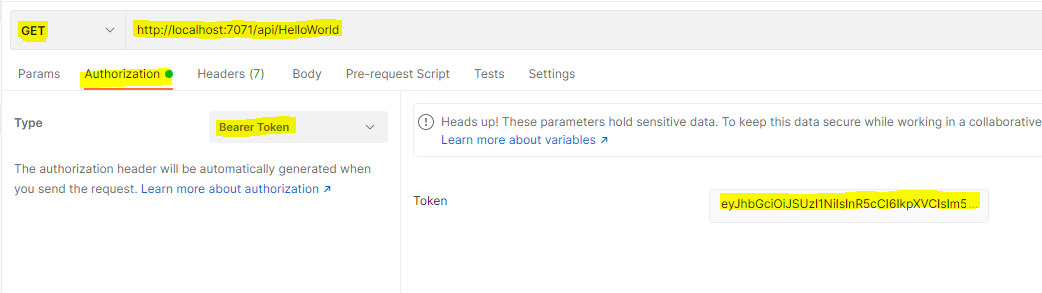
We will now test our function app by calling the HelloWorld function from Postman. Perform the following steps:
Login to the Portal and browse to [portalUrl]/_services/auth/token. This will download a token for the currently authenticated user. Note that this endpoint is enabled by default, but can be disabled by setting the Site Setting Connector/ImplicitGrantFlowEnabled to False.
Open the downloaded token file in Notepad and copy the content.
In Postman, creates a GET request to the HelloWorld endpoint. Set the authorisation type to be Bearer Token and paste in the token you copied from the previous step. The screenshot below shows the key settings in Postman.
Click Send and you should get back a 200 response with a message similar to the below.
Try removing the token from the request, or specify an old token (tokens expire after 15 minutes by default) and verify that the endpoint now returns 401 with an appropriate message.
And that’s all there is to it
You have now implemented a secured function app where all endpoints are automatically protected and readily have access to information about the current Portal user.
As a side note, one benefit of using a Portal-issued token (as oppose to reusing the sign-in token) is that what we have done above will work regardless of which authentication provider was used to sign-in to the Portal. For example, it will work even if Portal was setup to use local accounts (i.e. password stored in Contact records in CRM). It will also work if Portal supports multiple authentication providers for sign-in, or if you reconfigure Portal to use a different authentication provider.
CRMQuickDeploy now has the ability to deploy Content Snippets to PowerApps Portal from Visual Studio. Below are information on how to structure content snippets in your Visual Studio project.
Folder name
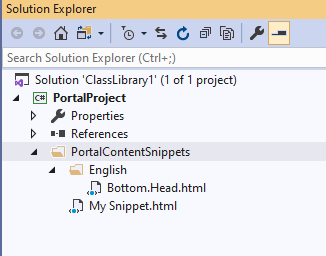
Like other supported Portal artefact types, content snippets need to be stored in a particular folder in your Visual Studio project. The folder name for content snippets is PortalContentSnippets. Create this folder at the root of your Visual Studio project.
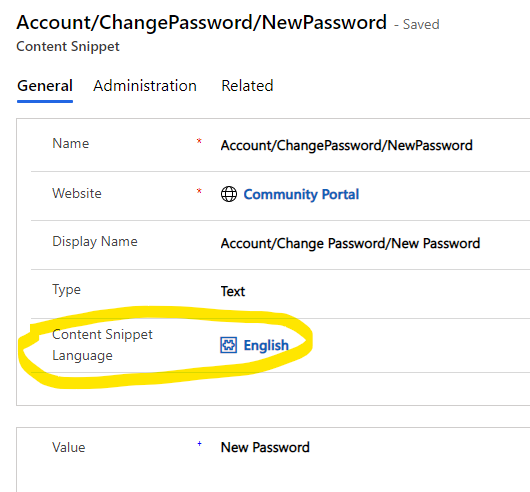
Sub-folder for content snippet language (optional)
In CRM, content snippets can be associated with a language (as seen below).
In Visual Studio, you can specify this language for your content snippets by creating a sub-folder under the PortalContentSnippets folder, e.g. ‘English‘. The tool will look for a language matching the name of the sub-folder.
This is optional though since Content Snippet Language is optional in CRM. If your content snippets are placed directly under the PortalContentSnippets folder in Visual Studio, then the tool will not associate it with a language when deploying to CRM.
Naming your content snippets in Visual Studio
As with other supported artefact types, the tool uses the file name of your items in Visual Studio to locate a matching record in CRM in order to create or update it.
With content snippets, the tool supports both creating and updating from Visual Studio. Use the following file extensions:
.html: the Type field in CRM will be set to HTML.
.txt: the Type field in CRM will be set to Text.
Special name mapping for ‘/’ character
There are some OOTB content snippets that Portal specifically look for by name, e.g. ‘Head/Bottom‘. Since the ‘/’ character cannot be used in an item name in Visual Studio, the tool uses a special name mapping rule to get around this.
Any ‘.’ in the item name in Visual Studio, except for the one immediately before the extension, will be converted to ‘/’ when searching for the target record in CRM.
For example, to target the ‘Head/Bottom‘ content snippet, name the item in Visual Studio as ‘Head.Bottom.html‘.
Example
Here is what your Visual Studio project should look like:
Download CRMQuickDeploy
You can download this extension from the Marketplace.
Currently PowerApps Portal does not support rich text editor out-of-the-box (OOTB). While the backend CRM has an OOTB rich text control that can be used in CRM, this unfortunately currently does not work on Portal.
You can add rich text editor support to PowerApps Portal using a JavaScript library such as CKEditor. While there are a few popular libraries out there, CKEditor is the library that Microsoft uses underneath the hood for their OOTB rich text control in CRM. For this reason, I recommend that you use CKEditor on the Portal to ensure that rich text submitted from the Portal can be viewed seamlessly from the backend CRM and vice versa. This post provides the steps and code to implement CKEditor on the Portal, and to address a few technical issues that I have encountered.
It’s actually fairly easy to implement CKEditor on the Portal (assuming that you want to enable it on multi-lines text fields). There are however two issues that I have encountered:
Field validation no longer works
Save Changes Warning on advanced form (aka web form) no longer works
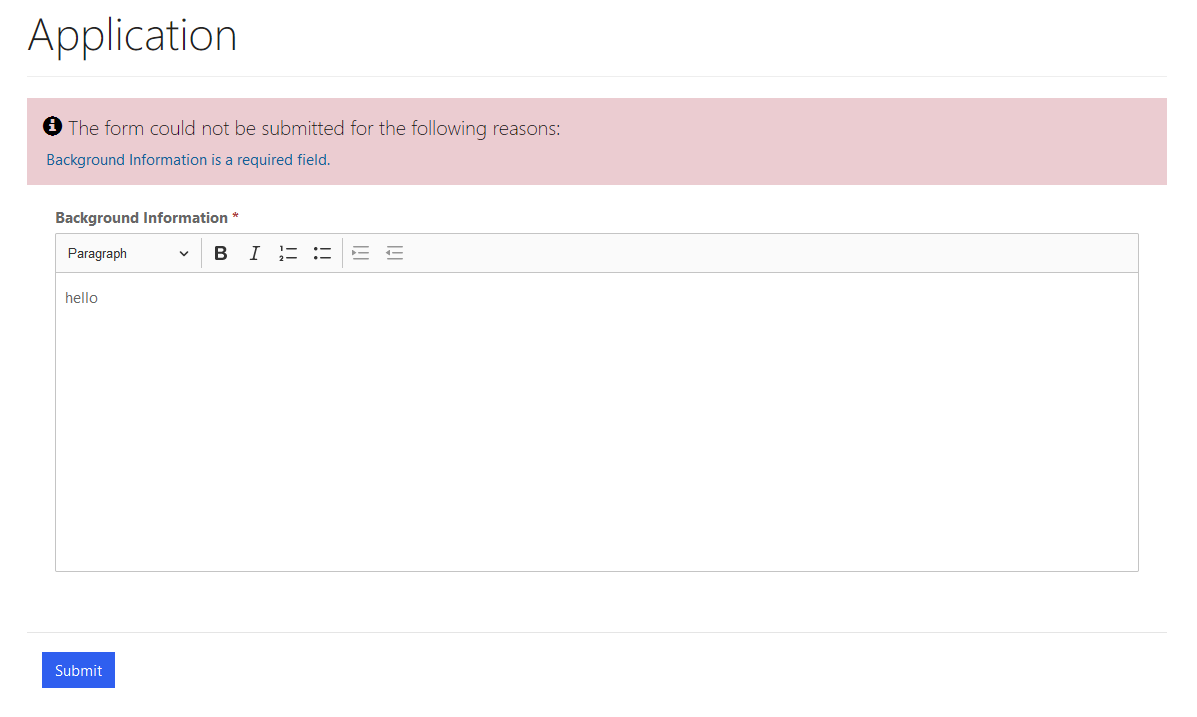
Field validation no longer works
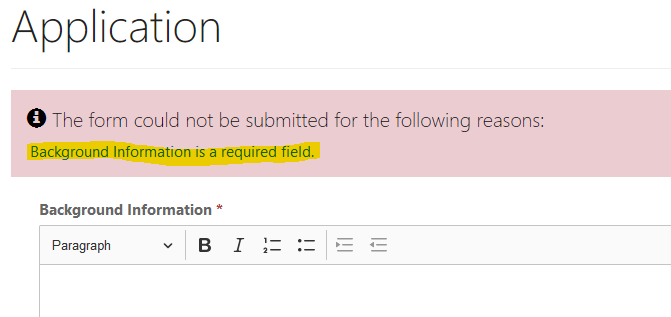
Validation such as mandatory field no longer works properly. In the screenshot below for example, user cannot submit the form due to the mandatory field validation error, even though they have typed a value into the rich text editor for that field.
Save Changes Warning on advanced form no longer works
Advanced form (aka web form in the old terminology) has a feature that can be enabled to warn user about unsaved changes upon leaving the page.
This option no longer works for fields where the rich text editor is enabled. That is, if a user has made a change to a rich text enabled field, then they will not be warned about unsaved changes when they navigate away from the page.
Root cause
The root cause for the above issues is because CKEditor adds a separate HTML element to the form for each field that is rich text enabled (and hides the original field). When you type into the rich text editor, it is this HTML element that you are editing, and not the actual field underneath. The OOTB validation and unsaved changes warning however, operate on the actual fields (and not the HTML elements that CKEditor injected onto the form). While CKEditor has built-in smart to automatically copy content from its injected HTML elements to the actual fields upon form submission (therefore enabling the content to be saved to CRM without any work on your behalf), the timing of this does not appear to be right for the aforementioned OOTB features to work correctly.
Solution
To solve this issue, we will use CKEditor’s autosave feature. This feature allows us to keep the content of the actual fields in sync with the injected HTML elements as the user types into the rich text editor. As this will be done continuously on a near-real-time basis, this will enable the aforementioned OOTB features to work correctly.
OK! Show me the steps (and the code)!
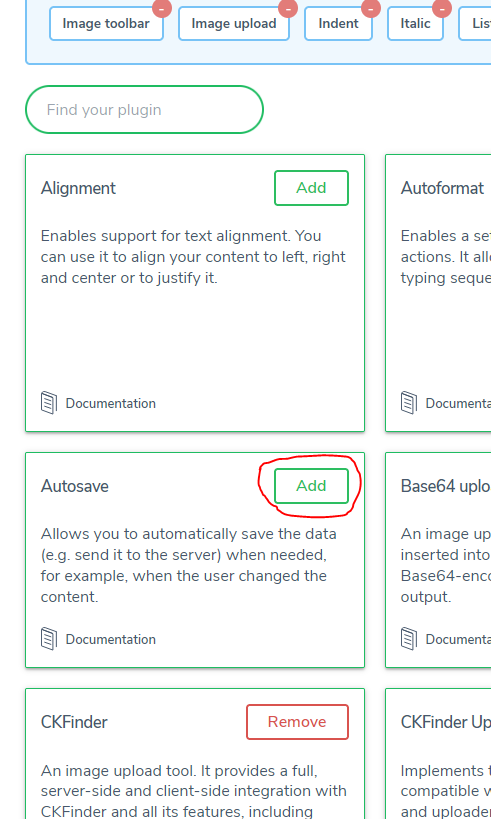
Acquire a build of CKEditor with the Autosave plugin
The autosave feature is not included in any of the CKEditor packages by default, so we will need to generate a custom build of CKEditor. Go to https://ckeditor.com/ckeditor-5/online-builder/ and choose your preferred editor style. When you get to the “Choose editor plugins” step, make sure you click Add on Autosave.
Progress to the step where you can build and download the generated package, which is a zip file. Grab the ckeditor.js file in the build folder of the zip. This is the file that we will need to reference on our web page.
Prepare Portal artifacts in CRM
I won’t go into details here as these are general Portal management step, but at a high level you will need to:
Upload ckeditor.js as a web file to CRM
Configure your basic form (aka entity form) or advanced form
Configure your web page
Test your web page
Add code to web page to implement rich text editor
Add the following to your web page’s HTML. Review the inline comment.
<!-- Add reference to our build of CKEditor -->
<script src="/ckeditor.js"></script>

<!-- By default the height of the rich text editor will be pretty small. This CSS will increase its height to 300px. You may
	want to move this to a global CSS file. -->
<style>
	.ck-editor__editable_inline {
		height: 300px;
	}
</style>

<script>
	/**
	 * This script initialises the rich text editor for the target field. You may want to move this code into the web page's JavaScript
	 * section, or to a dedicated JS web file.
	 * */
	$(document).ready(function () {
		/**
		 * It appears we need to specify the toolbar when using a custom build of CKEditor. See this post to learn how to discover all the
		 * component names that you can list on the toolbar: https://ckeditor.com/docs/ckeditor5/latest/api/module_core_editor_editorconfig-EditorConfig.html#member-toolbar
		 * */
		ClassicEditor.create(document.querySelector("#new_backgroundinformation"), {
			toolbar: ["heading", "|", "bold", "italic", "numberedList", "bulletedList", "|", "indent", "outdent"],
			autosave: {
				save(editor) {
					//This method must return a promise.
					var $deferred = $.Deferred();

					//Access the source field for the editor and copy content over to it.
					var sourceElementId = editor.sourceElement.id;
					$("#" + sourceElementId).val(editor.getData());

					//This is an OOTB Portal function and marks the field as dirty.
					setIsDirty(sourceElementId);

					//We have done all we need to do so mark the promise as resolved before returning it.
					$deferred.resolve();
					return $deferred.promise();
				}
			}
		});
	});
</script>
You should now have CKEditor integrated nicely into your Portal. You should also configure the OOTB rich text control in the CRM backend so that the rich text submitted from Portal will be displayed nicely to your CRM users.
But wait…
There is actually one more issue with CKEditor on the Portal. OOTB, you can click on a validation error message (highlighted in the screenshot below), and the page will scroll to the offending field and that field will receive the focus.
With CKEditor enabled, it still scrolls to the field, but the field no longer receives the focus. This is because the actual field is hidden by CKEditor. I don’t have a solution for this yet, but it appears to be a minor issue.
Essentially the approach here is to use Liquid to output the content of the EntityImage field to a JavaScript variable, and then use JavaScript to convert that to base64-encoded image data and dynamically create an <img> tag on the page.
For some unknown peculiar reason however, Liquid will throw an error
Liquid error: Exception has been thrown by the target of an invocation.
While the above fix will technically work, it may not be acceptable from a security perspective (depending on your scenario/requirements). For example, you probably don’t want to grant Global Read to the Account entity.
I have found that you can get this to work by granting Global Read permission to the Image Descriptor entity instead, and not the parent entity of the EntityImage field. Image Descriptor is the entity that CRM uses to store image data behind the scene.
In Liquid, you would then query the Image Descriptor entity and retrieve the EntityImage data like so:
The above code outputs the image data for an Account record that is specified via the id query string parameter.
Note that the entity permission for Image Descriptor still needs to be at Global scope. This entity however is less likely to be exposed directly to Portal users (e.g. via a web page or entity list), and therefore this approach may be more acceptable than granting Global Read on Account (for example).
It is interesting to note however that Microsoft documentation states that:
CRMQuickDeploy now supports a wider range of connection options to CRM, including client ID/secret and MFA. Below are examples of connection string to use for each scenario.
This mode would be suitable if no one ever look at your screen while you code :).
Client ID and secret
Without embedding client secret: url=https://yourcrm.crm6.dynamics.com;authtype=ClientSecret;clientid=yourclientid
The tool will prompt you to enter a client secret on the first deployment.
With client secret embedded: url=https://yourcrm.crm6.dynamics.com;authtype=ClientSecret;clientid=yourclientid;clientsecret=yourclientsecret
This mode would be suitable if no one ever look at your screen while you code:).
Office 365 user without MFA
Without embedding password: url=https://yourcrm.crm6.dynamics.com;AuthType=OAuth;username=user@yourdomain.com;AppId=51f81489-12ee-4a9e-aaae-a2591f45987d;RedirectUri=app://58145B91-0C36-4500-8554-080854F2AC97
The SDK’s login form will be shown to prompt you for the password. The AppId and RedirectUri values as seen here are provided by Microsoft and will work. However, you may want to create your own.
With password embedded: url=https://yourcrm.crm6.dynamics.com;AuthType=OAuth;username=user@yourdomain.com;password=userpassword;AppId=51f81489-12ee-4a9e-aaae-a2591f45987d;RedirectUri=app://58145B91-0C36-4500-8554-080854F2AC97
This mode would be suitable if no one ever look at your screen while you code :). The AppId and RedirectUri values as seen here are provided by Microsoft and will work. However, you may want to create your own.
Do not specify your password in the connection string. The SDK’s login form will be shown to prompt you for the password and the second-factor. The AppId and RedirectUri values as seen here are provided by Microsoft and will work. However, you may want to create your own.
This feature of CRMQuickDeploy is for xRM Portal CE only and does not work for D365 Portal (on cloud). The context of this post therefore is xRM Portal CE only.
When updating portal artefacts (such as web templates, web files, etc.), you need to refresh the portal cache for the changes to be picked up by the portal. During development, this means either triggering a request to cache.axd via a bookmarklet, or clicking the Clear Cache button on the /_services/about page of the portal.
While CRMQuickDeploy allows you to quickly deploy portal artefacts to CRM from Visual Studio, you still needed to manually trigger a portal cache refresh after each deployment. Not only this means extra work for you as the developer, it also has an impact on your productivity as the portal typically takes 3-8 seconds to recover after each cache refresh.
I am pleased to announce that a new feature has been added to CRMQuickDeploy to address these pain points. With CRMQuickDeploy 3.7, you can now specify the location of cache.axd for your portal as a solution property in Visual Studio. Each time a portal artefact is deployed, CRMQuickDeploy will automatically fire a request to the specified cache.axd to refresh the cache. Unlike the bookmarklet or the Clear Cache button however, which invalidate the entire portal cache, CRMQuickDeploy will invalidate only the specific CRM records that were updated by your deployment. This therefore significantly reduces the page load time in portal following a deployment.
Do note however that your browser may cache JS/CSS/HTML rendered by the portal, even if server-side cache has been refreshed by CRMQuickDeploy. You therefore may need to press Ctrl + F5 (as oppose to F5), or disable browser cache during development, to reload the page with all changes.
OK, so to make use of this feature, you will need to do two things:
Enable cache.axd for your targeted portal
Specify the cache.axd URL in Visual Studio
Enabling cache.axd for your portal
cache.axd is a special HTTP handler that can be used to invalidate server-side cache for your portal. This HTTP handler may not be enabled for your portal by default. To check if this handler is enabled, open the web.config for your portal and search for a line similar to this:
Important: Once enabled, this HTTP handler can be invoked by anyone that has access to your portal website, and can be used maliciously. You should enable this handler only in the development environment.
Specify cache.axd URL in Visual Studio
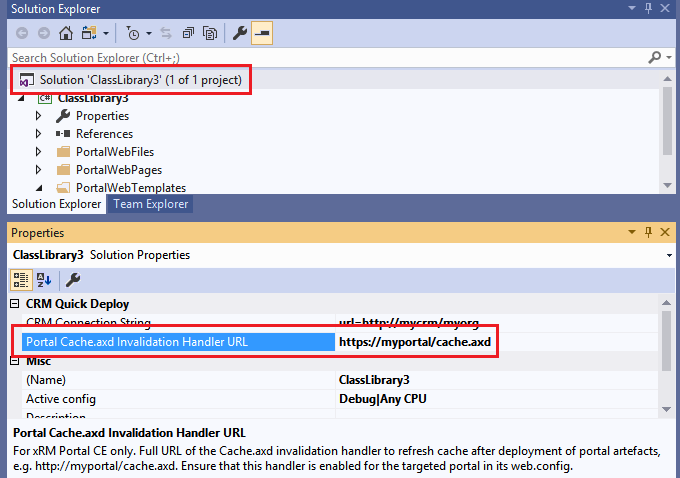
A new solution property, namely Portal Cache.axd Invalidation Handler URL, has been added to the solution node in Visual Studio. Specify the full URL to cache.axd for your portal website in this property, e.g. http://myportal/cache.axd if your website is at the root path, or http://myserver/portal/cache.axd if your website is not at the root path.
D365 Portal (on cloud) uses a completely different approach to invalidate portal cache. Unfortunately it does not seem to expose any hooks for us to be able to trigger the cache refresh programmatically. This means that unfortunately it is not possible to implement the same feature for D365 Portal at this stage.
User-specific options at the solution level are stored in the .suo file. Back when it was the norm to have your extension inherits from the Package class, and therefore loaded synchronously by Visual Studio, you can have these options loaded by overriding the OnLoadOptions method. This method is automatically called by the platform for each option key that you previously specified (via Package.AddOptionKey). The OnLoadOptions method would look something like the below.
Since synchronous loading of packages has been deprecated, your extension now should inherit from AsyncPackage (and have AllowsBackgroundLoading enabled and PackageAutoLoadFlags set to BackgroundLoad if applicable). When your package is loaded asynchronously in the background however, it may not have been loaded when the platform processes the .suo file, and therefore OnLoadOptions may not be called on your package, which results in user-specific options not being restored for the user.
A solution for this is to initiate the loading of solution user options in your own code (rather than relying on the platform). You can use the IVsSolutionPersistence.LoadPackageUserOpts method and pass in the option key to do this. Here are the steps:
Make your package class implements IVsPersistSolutionOpts.
public sealed class MyExtensionPackage : AsyncPackage, IVsPersistSolutionOpts
Add the following code to the package’s InitializeAsync method:
var solutionPersistenceService = GetService(typeof(IVsSolutionPersistence)) as IVsSolutionPersistence;

solutionPersistenceService.LoadPackageUserOpts(this, "MyOption");
solutionPersistenceService.LoadPackageUserOpts(this, "MyOption2");
//Other option keys
That’s it. Your OnLoadOptions method does not need to change.
Note that this will change the UX of your package slightly. When the user opens a solution in Visual Studio, they would be able to start using Visual Studio and work with the solution before your package finishes loading. This means that for a few seconds, the user options may not have been loaded, and this may confuse some users.