Use web templates as functions in Dynamics 365 Portal Liquid

In Dynamics 365 Portal, web templates are most often used to define reusable page layouts. Web templates however can also be used to create “functions” that “return” values, which you can then use to streamline your Liquid code.

I have put “functions” and “return” in quotes above because technically you can’t define functions with web templates. In fact, there are no ways to define a true function in Liquid that I am aware of! With some creative workaround however, you can come pretty close to achieving the same goals/benefits of functions with web templates. I will detail the approach in this post.

There are 3 main concerns that we need to address when it comes to function:

  • invoking the function,
  • input parameters, and
  • return values.

To invoke a web template from a web page, you can use the following liquid:

{% include “Name of the Web Template” %}

To pass input parameters to the web template, we can update the call above to be as follow:

{% include “Name of the Web Template” param1: value1, param2: value2 %}

Return values requires a bit of a workaround. Web templates predominantly render content and do not return values. However, any Liquid variables you create and assign value to in a web template are also available for use on the calling web page, i.e. outside of the web template. We can use this workaround to return values to the calling web page.

As an example, let say you want to list all the open Opportunities for a given Account on a page. On some other pages, you need to display them in a carousel. You therefore would like to encapsulate the retrieval of open Opportunities into a reusable function.

Create a web template function

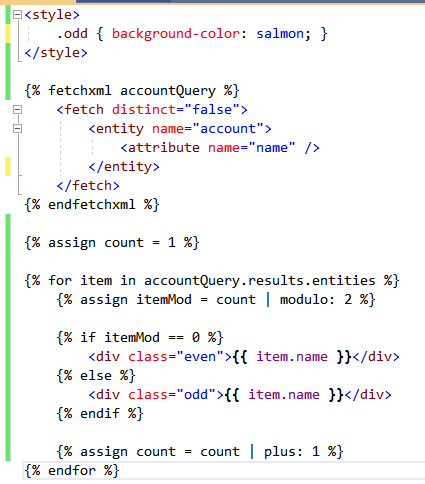
First, create a web template, e.g. Get Open Opportunities For Account, with the following code:

{% fetchxml query %}
	<fetch mapping="logical" distinct="false">
		<entity name="opportunity">
			<attribute name="name" />
			<attribute name="customerid" />
			<attribute name="estimatedvalue" />
			<attribute name="statuscode" />
			<attribute name="opportunityid" />
			<order attribute="name" descending="false" />
			<filter type="and">
				<condition attribute="statecode" operator="eq" value="0" />
				<condition attribute="parentaccountid" operator="eq" value="{{ accountId }}" />
			</filter>
		</entity>
	</fetch>
{% endfetchxml %}

{% assign opportunities = query.results.entities %}

This simple “function” expects an input parameter called accountId. It executes a Fetch query and returns the resulting records in a variable called opportunities.

Create the web page

Create a web page with the following code:

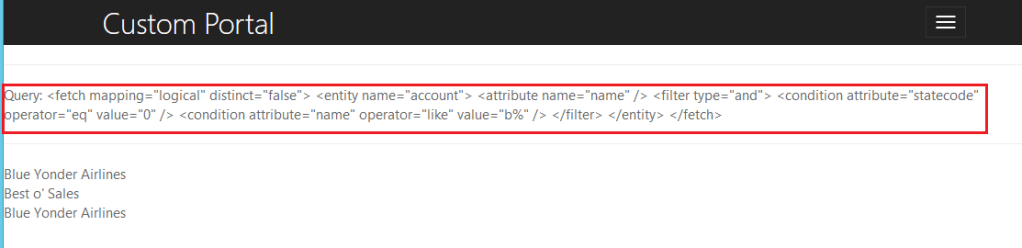
{% include "Get Open Opportunities for Account" accountId: request.params["accountid"] %}

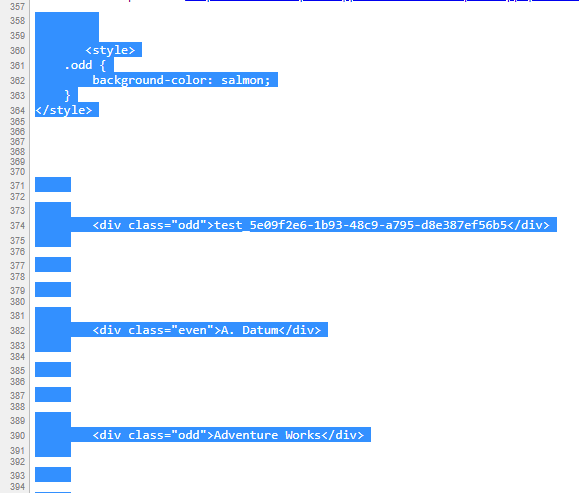
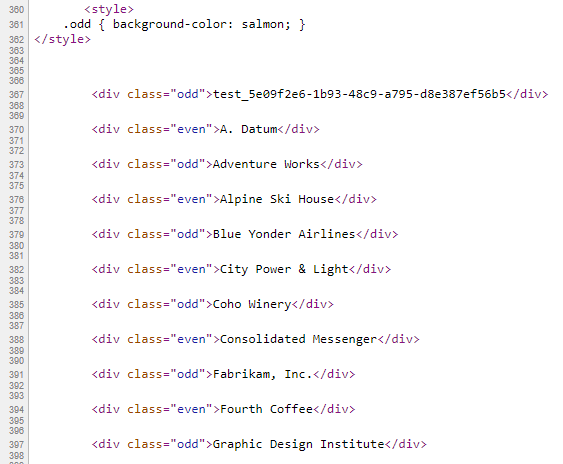
{% for record in opportunities %}
	{{record.name}}<br />
{% endfor %}

This simple web page invokes our function and pass in the account ID from the query string. It uses the returned result (in the opportunities variable) to render the list of Opportunities.

Other things to note and limitation

By creating multiple variables in your web template, you can return multiple values to the calling web page. In the example above for instance, you can create a separate return value to hold the total count of matching Opportunities.

In terms of limitation, the biggest I see is the readability of the code (the syntax isn’t the most natural for functions), and the discoverability of the input parameter(s) and return value(s). I’d suggest you workaround this by using the {% comment %} tag in your function web template.

One more thing…

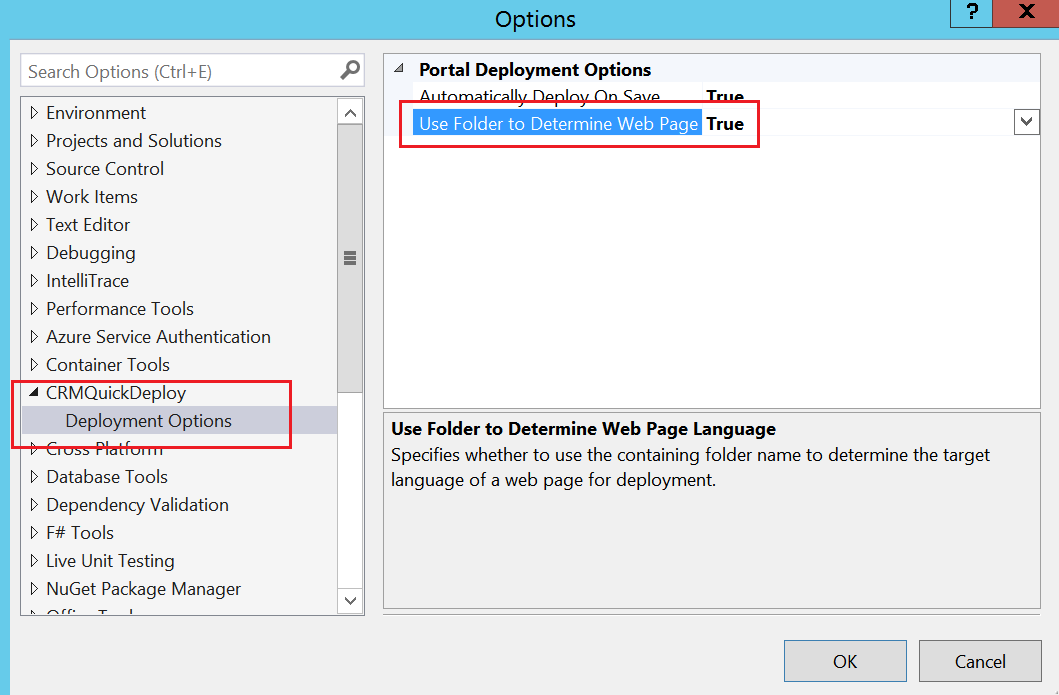
Do a lot of coding with Dynamics 365 Portal? You should check out my Visual Studio extension CRMQuickDeploy. This extension allows you to deploy HTML, Liquid, CSS, and JavaScript to a wide range of Portal artefacts (e.g. web templates, web pages, web files, entity forms, etc.) seamlessly from Visual Studio. Not only this would allow you to leverage the powerful editing features of Visual Studio, but also to source control your code – and facilitate multiple developers working on the project concurrently.

So there you have it…

Function is not a native concept in Liquid, but with a simple workaround, you can still encapsulate your logic into reusable blocks and use them throughout your code-base as if they were functions.


Advertisement
Posted in CRM, CRM Portal | Leave a comment

Fixed bug with web file deployment in CRMQuickDeploy 3.5.3

The previous version of CRMQuickDeploy introduced a new feature where it was possible to use folders in the Visual Studio project to specify the targeted language for Portal web page deployment. This means that you no longer have to name the root and localised web pages differently in CRM in order for the tool to target the right record for deployment.

Unfortunately this introduced a bug for web file deployment. In the DeploymentSettings.xml deployment configuration file for web files, you need to specify the name of the targeted parent web page for the web files. When you enable the “Use Folders to Determine Web Page Language” feature, the name of the root and the corresponding localised web pages in CRM are typically the same. Web files however should be attached to root pages only, and the tool did not filter out localised web pages when searching for the parent page during deployment.

I however could not simply just add the filter to look for root web pages. This is because this would not work when targeting Portal v7.x. The ability to localise web pages (and hence the concept of root web pages) were introduced from Portal v8.x.

To continue to support all versions of Portal from v7.x onward, I have added a new configuration attribute to the DeploymentSettings.xml config file.

This attribute is targetPortalVersion7=”false|true” and can be placed on the root node of the configuration file, i.e. DeploymentSettings. This attribute is optional, and the default value is false.

<?xml version="1.0" encoding="utf-8" ?>
<!-- targetPortalVersion7: Optional. Specifies whether the target Portal is v7.x. Default is false. This setting impacts how the parent web page is located for a web file. Localisation of web pages was added to Portal from version v8.x. This means there could be multiple web pages in the system with the same name (one is the root page, others are the localised pages). When this attribute is true, the tool will not look for root pages when retrieving the parent web page for a web file. When this attribute is false, only root web pages will be considered when retrieving the parent web page for a file. -->
<DeploymentSettings targetPortalVersion7="false">
	<WebFiles>
		...
	</WebFiles>
</DeploymentSettings>

Setting this attribute to false causes CRMQuickDeploy to apply a filter for root web pages when retrieving the parent web page for a web file deployment.

Configuration file update required for existing developers targeting Portal v7.x

Since the default value for this attribute (including when it is not present) is false, developers currently targeting Portal v7.x needs to update their DeploymentSettings.xml to set this attribute to true.

Download

You can download CRMQuickDeploy from the Visual Studio Marketplace.

Posted in CRM, CRM Portal, CRMQuickDeploy | Leave a comment

Improved password management in new version of CRMQuickDeploy

In previous versions of CRMQuickDeploy, if your connection string requires a password, then the password needs to be specified as clear text in the connection string. While the password is not checked in to source control, and is not saved to disk in clear text, it can still lead to some pretty awkward situations.

With the latest version (3.5.3) of CRMQuickDeploy you now have the option of not specifying the password in the connection string. When a deployment is triggered, the tool examine the connection string to see if a password is required. If a password is required, and is not specified in the connection string, then a dialog is shown to prompt you to provide your password. The password that you provide is not written to any file and is cached for the remaining of the Visual Studio session.

The tool determines that a password is required if it encounters one of the following parameters in the connection string:

  • UserName
  • User Name
  • UserId
  • User Id

You can still specify the password in the connection string if you wish, although this is generally not recommended (unless you are using a dummy account for deployment). If you do this, CRMQuickDeploy will work as it always has been and you will not receive the prompt to enter your password on deployment.

Download

You can download CRMQuickDeploy from the Visual Studio Marketplace.

Posted in CRM, CRM Portal, CRMQuickDeploy | Leave a comment

Better support for localised Portal web pages in new version of CRMQuickDeploy

Background

When deploying Portal web pages, CRMQuickDeploy uses the web page’s name in CRM (and the filename of the project item) to identify the target web page for deployment. Since version 8 of CRM Portal however, we have the ability to localise web pages. This created a small problem for CRMQuickDeploy, since by default the name of the localised pages are the same as the name of the root page. Below is how the root and localised pages would look by default:

The workaround (before now)…

The way we have worked around this was to edit the name of the localised web pages to make them unique. We appended the language name to the name of each localised web page, e.g. Contact Us (English) and Contact Us (Spanish), and named our Visual Studio project items accordingly.

Issue with CRM Portal v9…

The above workaround was a bit annoying but it worked well and did not take up too much time. It recently came to my attention however that CRM Portal v9 (i.e. the cloud version) automatically reverts the name of the localised web pages back to be same name as their root pages.

Yes, in CRM Portal v9, you can edit and save the name of the localised web pages. However, if you later on reopen the localised web page record in CRM’s web client, then the form automatically reverts the name back to be the same as the root page. This means that the workaround described above is no longer viable.

Improved web page language targeting in CRMQuickDeploy

To address this issue I have released a new version of CRMQuickDeploy that allows you to define the target language for web pages by placing the Visual Studio project items into a folder. The name of the folder is the name of the target language.

So for the above example, the structure of the Visual Studio project would look like this:

Under this approach, English\Contact Us.html for example would be deployed to the Contact Us web page where the language of that page is set to English. Note that only the immediate parent of the VS project item is used to determine the target language.

Enabling web page language targeting

To prevent this new approach from breaking your current project structure, this new feature of web page language targeting must first be enabled in Visual Studio. You can do this by going to Tools \ Options \ CRMQuickDeploy \ Deployment Options and set Use Folder to Determine Web Page Language to True.

When this option is enabled, each web page must be placed in a folder (underneath the PortalWebPages folder). The name of the immediate containing folder will be used as the target language for its children web pages.

Download

You can download CRMQuickDeploy from the Visual Studio Gallery.

So there you have it…

This new feature allows you to target web pages more efficiently, and works against both on-cloud and on-prem (v8) CRM Portal.

As always, would love to hear from you with feedback and suggestion!

Posted in CRM, CRM Portal, CRMQuickDeploy | Leave a comment

How to set value for date-time field by JavaScript in CRM Portal

Date-time fields in CRM Portal is a bit tricky when it comes to setting value dynamically using JavaScript. Behind the scene there are two HTML input fields that we need to worry about.

First is the field that actually contains the value that will be submitted to the server. This field has the CRM attribute name as its HTML ID. This field is not displayed on the page. The second is the field that holds the display value and enables the date-time picker. Below is what the HTML of these fields would look like:

We’d need to set both of these fields in order for the date-time field to work correctly.

The trick is the value that you set for these fields need to be in a particular format. For the submit field, the value should be a UTC date-time string in the format 2018-07-24T02:13:36.0000000. Note that the fractional second part (the last part) requires 7 digits.

For the display field, the value should be a local date-time string in the format determined by the current page (based on the page’s localisation). You can find this format in the data-date-format attribute of the HTML element for the display field.

Luckily CRM Portal uses moment.js by default and we have access to this library on our pages. This makes converting and formatting date-time easy. Below is the complete code to set value for a date-time field. Please review the inline comments.

//fieldId: ID (CRM attribute name) of the field we are setting.
//dateValue: The date-time value to set to. This should be of type Date. 
function setDateTimeFieldValue(fieldId, dateValue) {
	//Get the submit field
	var $submitField = $("#" + fieldId);

	//Get the display field
	var $displayField = $submitField.nextAll(".datetimepicker").children("input");

	//Get the display date format
	var dateFormat = $displayField.attr("data-date-format");

	//Set the submit field. Remember this needs to be in UTC and the format must be exact.
	$submitField.val(moment.utc(dateValue).format("YYYY-MM-DDTHH:mm:ss.SSSSSSS"));

	//Set the display field using the page's date format
	$displayField.val(moment(dateValue).format(dateFormat));
}
Posted in Adxstudio, CRM, CRM Portal | 3 Comments

Introducing VSTS Quick Reply: a Chrome extension that helps you collaborate quicker in VSTS discussion

Teams often leverage the discussion feature, in particular the ability to @mention team members, in VSTS for work items to collaborate on requirements, tasks and bugs. In large teams it is common to @mention several team members on messages to ensure that the relevant people are involved in the discussion.

VSTS however currently does not have a “Reply all” feature, which means you have to manually @mention each member in the previous message when replying to a discussion post.

I have developed a simple Chrome extension, VSTS Quick Reply, to help with this. This simple extension adds a Reply and Reply All links to each discussion message that have been posted against the current work item. When clicked, these links add all the @mentioned users and/or the original poster of the selected message to your new message entry textbox so that you don’t have to manually type them again.

Currently this extension only supports VSTS. You can install this extension from the Chrome Web Store.

That’s it! I hope this simple extension can give you a small productivity boost when collaborating in VSTS. I would love to hear from you with feedback and suggestions!

Posted in TFS, VSTS | 5 Comments

How to get current user info in VSTS web by JavaScript

I have been exploring extending the VSTS web interface and I needed to get the display name of the current user in JavaScript. It turns out there is a JavaScript variable that is available on all pages, namely __vssPageContext. This variable contains many contextual information. I was able to get what I needed from __vssPageContext.webContext.user:

Posted in TFS, VSTS | Leave a comment

Getting VSTS user ID by display name using REST

I have been exploring the VSTS REST API lately. While there are quite a few services that require the user ID as parameter, it isn’t very obvious how you can obtain that user ID for a given user in the first place.

For my requirement I needed to get the user ID for a given user by their display name. The only way I have found to achieve this (via REST) is to use the Graph service, which is still in preview. The steps are described below.

First, we need to call the List all users service (https://[account].vssps.visualstudio.com/_apis/graph/users). This will return a list of all users. Each user record has the following structure:

{
	"subjectKind": "user",
	"domain": "Windows Live ID",
	"principalName": "[value removed]",
	"mailAddress": "[value removed]",
	"origin": "msa",
	"originId": "[value removed]",
	"displayName": "[value removed]",
	"_links": {
		"self": { "href": "https://[account].vssps.visualstudio.com/_apis/Graph/Users/msa...[value removed]" },
		"memberships": { "href": "https://[account].vssps.visualstudio.com/_apis/Graph/Memberships/msa...[value removed]" },
		"membershipState": { "href": "https://[account].vssps.visualstudio.com/_apis/Graph/MembershipStates/msa...[value removed]" },
		"storageKey": { "href": "https://[account].vssps.visualstudio.com/_apis/Graph/StorageKeys/msa...[value removed]" },
		"avatar": { "href": "https://[account].visualstudio.com/_apis/GraphProfile/MemberAvatars/msa...[value removed]" }
	},
	"url": "https://[account].vssps.visualstudio.com/_apis/Graph/Users/msa...[value removed]",
	"descriptor": "msa...[value removed]"
}

Using the displayName property we can locate the user record that we are after. We then need to invoke the service identified by the _links.storageKey property to retrieve the ID for this user. The URL of this service looks like this (value has been changed):

https://[account].vssps.visualstudio.com/_apis/Graph/StorageKeys/msa.XWI1NTUyXYZtMTzyZi09OTZhXYZmMDktXYkwZjA9NzQxZTK9

The above service returns a structure as follow:

{
	"value": "[GUID]",
	"_links": {
		"self": { "href": "https://[account].vssps.visualstudio.com/_apis/Graph/StorageKeys/msa...[value removed]" },
		"descriptor": { "href": "https://[account].vssps.visualstudio.com/_apis/Graph/Descriptors/[GUID]" 
		}
	}
}

The ID of the user can be found in the value property.

So there you have it…

Unfortunately currently it requires two calls to get the ID of a user given their display name. This might change in the future though as Microsoft’s documentation is indicating that the ability to search for user by UPN or display name is coming soon to the Graph service.

Posted in TFS, VSTS | Leave a comment

How to edit related entity in CRM Portal web form step

In CRM Portal, different web form steps of a web form can operate on different entities. Imagine you have an Enrolment web form that allows students to enrol in courses. The first step of this form might capture student details (Student entity). The second step might capture the enrolment details (Course Enrolment entity). The Student entity would have a lookup to the Course Enrolment entity in this particular example.

Each web form step of the web form must have a Mode specified, which can be Insert, Edit or ReadOnly. If you want to allow users to be able to edit the form (e.g. save and resume), then you would typically need (at a minimum) a web form where all the steps are set to Edit mode.

As the 2nd step operates on a related record, and not the main record that the user clicked on to launch the form however, there is no OOTB way to configure this as an Edit step.

This is because for Edit mode, we need to provide the step with the source record. OOTB however, the available options are:

  1. Query String
  2. Current Portal User
  3. Result From Previous Step
  4. Record Associated to Current Portal User

Since our record is not related to the current Portal User, option 2 and 4 above are no good. Since the record that our 2nd step operates on is different to that of the 1st step, option 3 is also no good. The only viable option for us is the first option, Query String.

The problem here is that CRM Portal does not include the ID of the related record (the one our 2nd step operates on) in the URL when the user navigates to the 2nd step of the form.

So how do we workaround this?

The workaround…

The workaround, at a high level, is to use JavaScript to manipulate the URL to pass the ID of the related record in the query string to our 2nd step. This JavaScript will run on load of the 1st step, and update the action property of the form HTML element. This effectively changes the URL that is used to navigate to the 2nd step.

Perform the following:

  • Add the lookup field to the related entity (e.g. new_courseenrolmentid) to the backing CRM form of the 1st step. This enables our JavaScript on the web form step to read this value.
  • Make the lookup field above read-only on the backing CRM form so that users cannot update this field on the Portal.
  • Configure the following JavaScript for the 1st web form step. This script passes the ID of the related record to the 2nd web form step using the ‘relatedid‘ query string parameter. Please review the in line comment.
function appendRelatedEntityIdToQueryString() {
	//Append the ID of the related record to the form's post URL using the 'relatedid' query string parameter.
	//If this query string param already exists in the URL then it is updated. Else, it is appended to the end of the URL.

	var relatedEntityId = $("#new_courseenrolmentid").val();

	var $form = $("form");
	var formActionUrl = $form.prop("action");

	if (formActionUrl.indexOf("&relatedid=") == -1) {
		//The URL does not contain our param so just add it.
		formActionUrl += "&relatedid=" + relatedEntityId;
		$form.prop("action", formActionUrl);
		return;
	}

	//Find the existing param in the URL and replace its value.
	var queryStringStartIndex = formActionUrl.indexOf("?") + 1;
	var queryString = queryStringStartIndex == 0 || queryStringStartIndex == formActionUrl.length
		? ""
		: formActionUrl.substring(queryStringStartIndex);

	var queryPairs = queryString.split("&");

	var newQueryString = "";

	for (var i = 0; i < queryPairs.length; i++) {
		/*Find the relatedid and replace it.*/

		if (queryPairs[i].indexOf("relatedid=") == 0) {
			queryPairs[i] = "relatedid=" + relatedEntityId;
		}

		if (newQueryString == "") {
			newQueryString = queryPairs[i];
		} else {
			newQueryString += "&" + queryPairs[i];
		}
	}

	formActionUrl = formActionUrl.substring(0, queryStringStartIndex) + newQueryString;
	$form.prop("action", formActionUrl);
}

$(function () {
	appendRelatedEntityIdToQueryString();
});
  • Configure the 2nd web form step as follow:
    • Set Target Entity Logical Name to the related entity (e.g. Course Enrolment)
    • Set Mode to Edit
    • For Record Source:
      • Set Source Type to Query String
      • Set Primary Key Query String Parameter Name to relatedid
      • Set Primary Key Attribute Logical Name to the lookup field (e.g. new_courseenrolmentid) on the primary entity

That’s it!

Now you should be able to edit the related entity on your 2nd web form step.

By the way…

Do a lot of JavaScript, CSS, HTML and Liquid coding with CRM Portal? Want to source-control these artefacts and work together with your team without overwriting each other’s code? Then check out my Visual Studio extension CRMQuickDeploy! This simple extension allows you to work with these artefacts in Visual Studio and quickly deploy them to CRM!

Posted in CRM, CRM Portal | Leave a comment

Loading entity form dynamically from JavaScript in CRM Portal

This has been tested on xRM Portal CE only.

There may be times where you need to load and display an entity form by JavaScript in CRM Portal. For example, you may have a content page with a link that when clicked, should display an entity form in a modal dialog. You want the modal dialog to display the entity form without any of the site’s branding, navigation, footer, etc.

You can achieve this by leveraging an OOTB service that renders the entity form. This is the same service that is used by the OOTB entity lists and sub-grids.

The service…

The URL for this service is:

[rootWebSite]/_portal/modal-form-template-path/[portalId]?id=[recordId]&entityformid=[entityFormId]

  • portalId: The service seems to be happy with any GUID. We used an empty GUID (00000000-0000-0000-0000-000000000000) and it was fine.
  • recordId: Guid of the record you want to display
  • entityFormId: Guid of the entity form record you want to use

This service returns an HTML document containing the specified entity form loaded with the specified record. The site’s branding, navigation, footer, etc. are excluded, which means the HTML document is ready to be used in a modal dialog via an iframe.

The modal dialog…

CRM Portal uses Bootstrap, so we will use Bootstrap’s modal to load an iframe that invokes the service above and displays the entity form. Again, this is the same approach used by the OOTB entity lists and sub-grids.

Below is the HTML that should be added to the page. The first part (the div) is the normal page content. The second part (the section) is the modal dialog that stays hidden until the user clicks the link in our content. The code for this second part was adapted from the modal element used by the OOTB entity list. Please review the inline comments below.

<!--This is our main content-->

<div>
	Hello world. <a href="javascript:loadEntityFormAsModal();">Click me!</a>
</div>


<!--Code adapted from modal element of entity list. The ID of the section element is used in the JavaScript below.-->

<section id="myModalDialog" aria-hidden="true" aria-label="<span class='fa fa-info-circle' aria-hidden='true'></span> My Modal Title" class="modal fade modal-form modal-form-details" data-backdrop="static" role="dialog" tabindex="-1" style="display: none;">
	<div class="modal-lg modal-dialog">
		<div class="modal-content">
			<div class="modal-header">
				<button aria-label="Close" class="close" data-dismiss="modal" tabindex="0" title="Close" type="button">
					<span aria-hidden="true">×</span><span class="sr-only">Close</span>
				</button>
				<h1 class="modal-title h4" title="My Modal Title">My Modal Title</h1>
			</div>
			<div class="modal-body">
				<div class="form-loading" style="display: none;">
					<span class="fa fa-spinner fa-spin fa-4x" aria-hidden="true"></span>
				</div>

				<iframe src=""></iframe>
			</div>
		</div>
	</div>
</section>

Next we need to add the below JavaScript to the page. If embedded on the same page, then should be wrapped in <script> tags. This script was adapted from the OOTB entity-grid.js script. Please review the inline comments below.

function loadEntityFormAsModal() {
	//Code adapted from entityGrid.prototype.addDetailsActionLinkClickEventHandlers in \js\entity-grid.js.

	//Setup the record and entity form you want to display
	var portalId = "00000000-0000-0000-0000-000000000000";
	var recordId = "B3FEC1EB-7F68-E811-859D-B86B23AC9F7C";
	var entityFormId = "396293DD-9D46-E811-8551-B86B23AC9F7C";

	//Form the URL to the service
	var url = "/_portal/modal-form-template-path/" + portalId + "?id=" + recordId + "&entityformid=" + entityFormId;

	//This ID needs to match the ID of the modal section element.
	var $modal = $("#myModalDialog");

	//Retrieve the iframe of the modal and set it load the service
	var $iFrame = $modal.find("iframe");

	$iFrame.attr("src", url);

	//Hook in handler to hide loader image when done loading
	$iFrame.on("load", function () {
		$modal.find(".form-loading").hide();
		$modal.find("iframe").contents().find("#EntityFormControl").show();
	});

	//Show the loader image at start
	$modal.find(".form-loading").show();
	$modal.find("iframe").contents().find("#EntityFormControl").hide();

	$modal.on('show.bs.modal', function () {
		$modal.attr("aria-hidden", "false");
	});

	$modal.off("hidden.bs.modal.entitygrid").on("hidden.bs.modal.entitygrid", function () {
		$modal.attr("aria-hidden", "true");
	});

	$modal.modal();
}

That’s it!

And there you have it, you can now dynamically launch an entity form in JavaScript. Leveraging the OOTB service means that any entity permissions you may have setup will be honoured, and any JavaScript attached to the entity form itself will also be executed.

By the way…

Do a lot of HTLM, JavaScript, CSS and Liquid coding in CRM Portal? You should check out my Visual Studio extension CRMQuickDeploy. This allows you to work with HTML, JavaScript, CSS and Liquid in Visual Studio and quickly deploy them to CRM Portal. Not only this improves your productivity, but also allows you to source control these artefacts and facilitates scenarios where multiple developers work on the same code base.

Posted in CRM, CRM Portal | 7 Comments