
Due to limitations of OOTB Power Apps Portal, a common requirement is to have a custom HTTP service that you can invoke by JavaScript on a Portal page, which performs some complex processing or querying to provide a custom user experience. More often than not, there are two key security requirements for this service:
- It should be accessible only to authenticated Portal users
- The current Portal user context (e.g. ID) should be passed securely to the service
In this post I will outline the architecture, steps and codes to implement such a service on Azure Function.
Architecture overview
In short, we will be using an OAuth token to authenticate the user at the service end. This token will also contain key information about the calling user, such as ID and email address. The JS on our Portal page will acquire this token, and pass it to the service via a request header when making the service call.
One common assumption is that since you can secure both the Portal and the service against a common authentication provider (e.g. Azure B2C), you therefore should be able to configure SSO between the Portal and the service using the token from that provider. Unfortunately however, this assumption is not true.
In reality, the user token you retrieve from Portal (after user has authenticated) is not the same token (from B2C for example) that the user used to sign-in to Portal. Instead, Portal creates a new token, signs it with its key and returns that to you. Using the config options in Azure Portal alone, we cannot configure the Azure Function App to authenticate against this token from Portal. We will need custom code to do this, and our code will need to validate the Portal token.
In summary the flow will be as follow:
- JavaScript on Portal page calls Portal’s /_services/auth/token endpoint to retrieve a token for the current user. Documentation for this endpoint can be found here.
- JavaScript invokes the custom service, passing the token in the Authorization request header (Bearer [token]).
- Service extracts the Bearer token from the request header.
- Service invokes Portal’s /_services/auth/publickey endpoint to retrieves Portal’s public key. Documentation for this endpoint can be found here.
- Service uses Portal’s public key to validate Bearer token and rejects request if token is invalid.
- If token is valid, service extracts user information from the token and makes it available to the rest of our service logic.
Key design decision #1: Perform authorisation as part of request pipeline (middleware)
Our function app is likely to contain multiple functions (endpoints) and they are likely to all require authentication and user context. We will implement the authorisation as part of the request pipeline. This will ensure that all functions are automatically protected (and have access to user context information) without us needing to implement anything special (such as a base class) for each function.
We will use middleware (similar to ASP.NET Core) to inject our authorisation code into the request pipeline. Middleware requires our function app to run under .NET 5 or .NET 6, and also in isolated process (aka out-of-process) in Azure. You can read more about in-process vs isolated here.
Side note: There is an obsolete feature, namely IFunctionInvocationFilter, that allows you to run code on invocation of each function. This feature has been in preview for many years (since 2019?), and appears will not be taken forward by Microsoft. Middleware is the recommended way for injecting custom logic into the request pipeline.
Key design decision #2: Retrieve Portal’s public key live
Portal’s authentication key, including its public key, expire every two years and must be manually renewed. In our custom service, we will retrieve the Portal’s public key live (instead of storing it into config). This will save us from having to update our service config each time the Portal’s public key changes. And beside, the key is not a single piece of string, which makes updating the config value for it on the Azure Portal quite awkward.
Key code components
Our function app will contain the following key classes:
- PortalPublicKeyProvider: This service is responsible for retrieving the public key of the target Portal. The URL of the target Portal will be stored in configuration of the function app.
- AuthorizationMiddleware: This is the middleware class that will perform the validation of the Bearer token. It will also extract user information from the token and make them available (via the UserInfoProvider class) to the rest of our function logic.
- UserInfoProvider: This class is the “vessel” for passing authorised user information from our middleware to the rest of our function logic.
Show me the code!
OK! Let’s look at some code! But first, some notes about creating your function app project:
- Choose .NET 6.0 Isolated (Long-term support) as the functions worker. This is required for using middleware in our code.
- Choose Http trigger as the function type.
- Choose Function as the authorization level. This will require the calling code to provide a known function key (configured in Azure Portal) when invoking a function. This adds an additional layer of security to our service, but it is optional.
Below is a screenshot from Visual Studio 2022. If you are missing some options, then please try updating your Visual Studio to the latest update.

PortalPublicKeyProvider
The first class we will implement is PortalPublicKeyProvider. This class will act as a service and will be responsible for retrieving the public key of the target Portal. This class will read the URL of the target Portal from the function app’s configuration.
Add the interface and class below and review the inline comments. You will also need to install the following packages:
- Microsoft.IdentityModel.Tokens
- BouncyCastle
using Microsoft.IdentityModel.Tokens;
using Org.BouncyCastle.Crypto.Parameters;
using Org.BouncyCastle.OpenSsl;
using System;
using System.IO;
using System.Net.Http;
using System.Security.Cryptography;
using System.Threading.Tasks;

namespace BNHPortalServices
{
	internal interface IPortalPublicKeyProvider
	{
		Task<RsaSecurityKey> GetPortalPublicKeyAsync();
	}

	/// <summary>
	/// This service queries the target Portal and retrieves its public key. This service caches the key after the initial request, and therefore should be
	/// registered as a singleton.
	///
	/// This service reads the URL of the target Portal using the app configuration key 'PortalUrl'.
	/// </summary>
	internal class PortalPublicKeyProvider : IPortalPublicKeyProvider
	{
		//Most of the code below is from https://github.com/microsoft/PowerApps-Samples/blob/1adb4891a312555a2c36cfe7b99c0a225a934a0d/portals/ExternalWebApiConsumingPortalOAuthTokenSample/ExternalWebApiConsumingPortalOAuthTokenSample/App_Start/Startup.cs
		//with some refactoring.

		private RsaSecurityKey _portalPublicKey;

		public async Task<RsaSecurityKey> GetPortalPublicKeyAsync()
		{
			if (_portalPublicKey == null)
			{
				//Query the target Portal and retrieve its public key as plain text, and then return it as a RsaSecurityKey - which is required
				//for validating the Bearer token.

				var publicKeyAsText = await GetPortalPublicKeyAsTextAsync();

				var pemReader = new PemReader(new StringReader(publicKeyAsText));
				var keyParameters = (RsaKeyParameters)pemReader.ReadObject();

				var rsaParameters = new RSAParameters
				{
					Modulus = keyParameters.Modulus.ToByteArrayUnsigned(),
					Exponent = keyParameters.Exponent.ToByteArrayUnsigned()
				};

				var rsaCryptoServiceProvider = new RSACryptoServiceProvider();
				rsaCryptoServiceProvider.ImportParameters(rsaParameters);

				_portalPublicKey = new RsaSecurityKey(rsaCryptoServiceProvider);
			}

			return _portalPublicKey;
		}

		private async Task<string> GetPortalPublicKeyAsTextAsync()
		{
			var portalPublicKeyUrl = $"{Environment.GetEnvironmentVariable("PortalUrl")}/_services/auth/publickey";

			var httpClient = new HttpClient();
			return await httpClient.GetStringAsync(portalPublicKeyUrl);
		}
	}
}
Now we need to register this class with the Dependency Injection framework so that we can access it from our authorisation middleware. The PortalPublicKeyProvider service caches the Portal’s key after the initial request. We therefore will register this service as a singleton.
Update the Program.cs file to be as follow and review the inline comments.
using Microsoft.Extensions.DependencyInjection;
using Microsoft.Extensions.Hosting;

namespace BNHPortalServices
{
	public class Program
	{
		public static void Main()
		{
			var host = new HostBuilder()
				//Register our services with the DI framework
				.ConfigureServices(services =>
				{
					services.AddSingleton<IPortalPublicKeyProvider, PortalPublicKeyProvider>();
				})
				.ConfigureFunctionsWorkerDefaults()
				.Build();

			host.Run();
		}
	}
}
App configuration setting
Our function app will require one configuration setting, which is the URL of the target Portal. This setting, namely PortalUrl, is used by the PortalPublicKeyProvider class above.
Update the local.settings.json to be as below. Remember to add the same setting via the Azure Portal once your function app is deployed to Azure.
{
    "IsEncrypted": false,
    "Values": {
        "AzureWebJobsStorage": "UseDevelopmentStorage=true",
        "FUNCTIONS_WORKER_RUNTIME": "dotnet-isolated",
        "PortalUrl": "https://myportal.powerappsportals.com"
    }
}
UserInfoProvider and UserInfo
Next we will implement the UserInfoProvider class, which is a simple “vessel” for our authorisation middleware to set the user information (once the user has been authorised), and for the rest of our function logic to pull those information back out.
We will also implement a class, namely UserInfo, to represent a set of information about a user. This class also acts as a mapper that maps specific claims in a given token to specific bits of user information. In this example we will map the user ID and email address.
Add the UserInfo class as below. Note that you will need to install the System.IdentityModel.Tokens.Jwt package.
using System;
using System.IdentityModel.Tokens.Jwt;
using System.Linq;

namespace BNHPortalServices
{
	public class UserInfo
	{
		public Guid UserId { get; private set; }
		public string Email { get; private set; }

		public UserInfo(JwtSecurityToken userToken)
		{
			UserId = Guid.Parse(userToken.Subject);
			Email = userToken.Claims.FirstOrDefault(c => c.Type == "email")?.Value;
		}
	}
}
Now add the interface and class below for the UserInfoProvider class.
namespace BNHPortalServices
{
	public interface IUserInfoProvider
	{
		public UserInfo UserInfo { get; set; }
	}

	internal class UserInfoProvider : IUserInfoProvider
	{
		public UserInfo UserInfo { get; set; }
	}
}
Now we need to register the UserInfoProvider class with the Dependency Injection framework so that we can access it from our authorisation middleware as well as our function logic. We will register this class using the AddScoped method so that a single instance of this class can be reused multiple times within the same request.
Update the Program.cs file to be as follow and review the inline comments.
using Microsoft.Extensions.DependencyInjection;
using Microsoft.Extensions.Hosting;

namespace BNHPortalServices
{
	public class Program
	{
		public static void Main()
		{
			var host = new HostBuilder()
				//Register our services with the DI framework
				.ConfigureServices(services =>
				{
					services.AddSingleton<IPortalPublicKeyProvider, PortalPublicKeyProvider>();
					services.AddScoped<IUserInfoProvider, UserInfoProvider>();
				})
				.ConfigureFunctionsWorkerDefaults()
				.Build();

			host.Run();
		}
	}
}
AuthorizationMiddleware
Next we will implement our authorisation middleware. This class will extract the Bearer token and validate it against the target Portal’s public key. If the token is valid, it will extract user information from the token and make them available to the rest of our function logic. Else, it will set the response of the request to 401 Unauthorized.
Add the AuthorizationMiddleware class as below and review the inline comments. Note that the code requires at least version 1.8.0-preview1 of the package Microsoft.Azure.Functions.Worker. You may need to update this package to this version or higher as the project template in Visual Studio uses a lower version by default.
using Microsoft.Azure.Functions.Worker;
using Microsoft.Azure.Functions.Worker.Http;
using Microsoft.Azure.Functions.Worker.Middleware;
using Microsoft.Extensions.DependencyInjection;
using Microsoft.Extensions.Logging;
using Microsoft.IdentityModel.Tokens;
using System;
using System.Collections.Generic;
using System.IdentityModel.Tokens.Jwt;
using System.Net;
using System.Net.Http.Headers;
using System.Text.Json;
using System.Threading.Tasks;

namespace BNHPortalServices
{
	internal class AuthorizationMiddleware : IFunctionsWorkerMiddleware
	{
		private ILogger _logger;

		public async Task Invoke(FunctionContext context, FunctionExecutionDelegate next)
		{
			_logger = context.GetLogger<AuthorizationMiddleware>();

			//Process the Authorization header if it is presents. Else, set response status to be 401.
			if (context.BindingContext.BindingData.ContainsKey("Headers"))
			{
				var headers = JsonSerializer.Deserialize<Dictionary<string, string>>((string)context.BindingContext.BindingData["Headers"]);

				if (headers.ContainsKey("Authorization"))
				{
					//Extract the Bearer token
					var authorization = AuthenticationHeaderValue.Parse(headers["Authorization"]);
					var bearerToken = authorization.Parameter;

					//Get the PortalPublicKeyProvider service to retrieve the Portal's public key
					var portalKeyProvider = context.InstanceServices.GetRequiredService<IPortalPublicKeyProvider>();

					var validationParameters = new TokenValidationParameters
					{
						IssuerSigningKey = await portalKeyProvider.GetPortalPublicKeyAsync(),

						//We are setting this to false here because by default the user token returned by Portal does not contain an
						//audience value. You can change this behaviour by registering a client ID using the
						//ImplicitGrantFlow/RegisteredClientId Site Setting in Portal. Read here for more
						//details: https://docs.microsoft.com/en-us/power-apps/maker/portals/oauth-implicit-grant-flow#register-client-id-for-implicit-grant-flow.
						ValidateAudience = false,

						//We are setting this to false as we are already validating the signing key.
						ValidateIssuer = false
					};

					try
					{
						//The ValidateToken method throws an exception if the token is invalid. We therefore will set the response
						//status to 401 on exception.
						new JwtSecurityTokenHandler().ValidateToken(bearerToken, validationParameters, out SecurityToken validatedToken);

						//Token is valid - extract user info and store it using our "vessel", the UserInfoProvider service.
						//Our function logic will use the UserInfoProvider service to pull back out the user
						//information when needed.
						var userInfo = new UserInfo(validatedToken as JwtSecurityToken);
						var userInfoProvider = context.InstanceServices.GetRequiredService<IUserInfoProvider>();

						userInfoProvider.UserInfo = userInfo;
					}
					catch (Exception e)
					{
						await SetUnauthorizedResponse(context, e.Message);
						return;
					}

					await next(context);
				}
				else
				{
					await SetUnauthorizedResponse(context, "Authorization header not found.");
				}
			}
			else
			{
				await SetUnauthorizedResponse(context, "Authorization header not found.");
			}
		}

		private async Task SetUnauthorizedResponse(FunctionContext context, string message)
		{
			_logger.LogWarning($"Authorization failed: {message}");

			//IMPORTANT: The calls to context.GetHttpRequestDataAsync() and context.GetInvocationResult() require
			//at least version 1.8.0-preview1 of the package Microsoft.Azure.Functions.Worker.
			var httpRequestData = await context.GetHttpRequestDataAsync();
			var response = httpRequestData.CreateResponse();

			response.StatusCode = HttpStatusCode.Unauthorized;
			await response.WriteStringAsync(message);

			context.GetInvocationResult().Value = response;
		}
	}
}
Now we need to tell our app to use our authorisation middleware. Update the Program.cs file to be as below and review the inline comments.
using Microsoft.Extensions.DependencyInjection;
using Microsoft.Extensions.Hosting;

namespace BNHPortalServices
{
	public class Program
	{
		public static void Main()
		{
			var host = new HostBuilder()
				//Register our services with the DI framework
				.ConfigureServices(services =>
				{
					services.AddSingleton<IPortalPublicKeyProvider, PortalPublicKeyProvider>();
					services.AddScoped<IUserInfoProvider, UserInfoProvider>();
				})

				//Register our middleware
				.ConfigureFunctionsWorkerDefaults(workerApplicationBuilder =>
				{
					workerApplicationBuilder.UseMiddleware<AuthorizationMiddleware>();
				})
				.Build();

			host.Run();
		}
	}
}
A sample function endpoint
The above are all the code that are required to secure your function app and provide it with information about the user context. Now let’s build a simple HelloWorld endpoint to test it.
Add the following class and review the inline comments. This is a simple GET HelloWorld function that returns the calling user’s ID and email address.
using System.Net;
using Microsoft.Azure.Functions.Worker;
using Microsoft.Azure.Functions.Worker.Http;
using Microsoft.Extensions.Logging;

namespace BNHPortalServices
{
    public class HelloWorld
    {
        private readonly ILogger _logger;
        private readonly IUserInfoProvider _userInfoProvider;

        //Inject the UserInfoProvider service into this class so we can access the user information.
        public HelloWorld(ILoggerFactory loggerFactory, IUserInfoProvider userInfoProvider)
        {
            _logger = loggerFactory.CreateLogger<HelloWorld>();
            _userInfoProvider = userInfoProvider;
        }

        [Function("HelloWorld")]
        public HttpResponseData Run([HttpTrigger(AuthorizationLevel.Function, "get")] HttpRequestData request)
        {
            _logger.LogInformation("C# HTTP trigger function processed a request.");

            var response = request.CreateResponse(HttpStatusCode.OK);
            response.Headers.Add("Content-Type", "text/plain; charset=utf-8");

            //Access information of the current user
            var userInfo = _userInfoProvider.UserInfo;

            response.WriteString($"Hello. You are {userInfo.UserId} with email address {userInfo.Email}.");

            return response;
        }
    }
}
Testing our function app
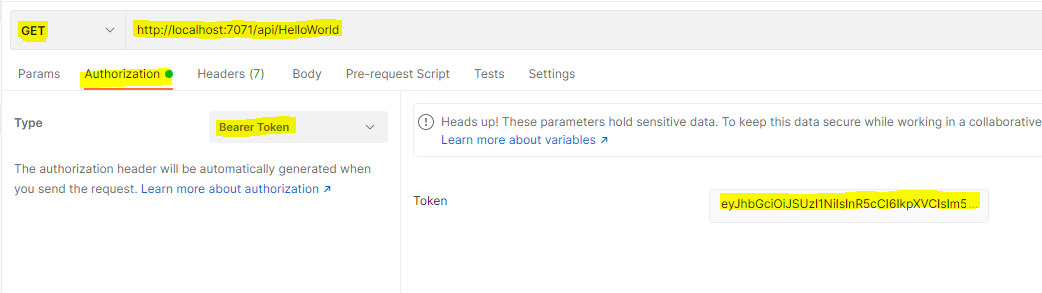
We will now test our function app by calling the HelloWorld function from Postman. Perform the following steps:
- Login to the Portal and browse to [portalUrl]/_services/auth/token. This will download a token for the currently authenticated user. Note that this endpoint is enabled by default, but can be disabled by setting the Site Setting Connector/ImplicitGrantFlowEnabled to False.
- Open the downloaded token file in Notepad and copy the content.
- In Postman, creates a GET request to the HelloWorld endpoint. Set the authorisation type to be Bearer Token and paste in the token you copied from the previous step. The screenshot below shows the key settings in Postman.
- Click Send and you should get back a 200 response with a message similar to the below.

- Try removing the token from the request, or specify an old token (tokens expire after 15 minutes by default) and verify that the endpoint now returns 401 with an appropriate message.
And that’s all there is to it
You have now implemented a secured function app where all endpoints are automatically protected and readily have access to information about the current Portal user.
As a side note, one benefit of using a Portal-issued token (as oppose to reusing the sign-in token) is that what we have done above will work regardless of which authentication provider was used to sign-in to the Portal. For example, it will work even if Portal was setup to use local accounts (i.e. password stored in Contact records in CRM). It will also work if Portal supports multiple authentication providers for sign-in, or if you reconfigure Portal to use a different authentication provider.

Pingback: July 4, 2022 Weekly Update on Microsoft Integration Platform & Azure iPaaS - Hooking Stuff Together
Pingback: July 4, 2022 Weekly Update on Microsoft Integration Platform & Azure iPaaS - BizTalkGurus