
When working with Adxstudio Portal (OnPrem) or CRM Portal (Online) you will find that JavaScript, CSS and Liquid web templates are stored in CRM records (i.e. CRM database), which is not good for source-control or scenarios where there are more than one developer actively working on the system.
CRMQuickDeploy now has the ability to deploy these artefacts from Visual Studio to Adxstudio/CRM Portal, including:
- Web Files
- Web Templates
- Entity Lists (JavaScript only)
- Entity Forms (JavaScript only)
- Web Form Steps (JavaScript only)
- Web Pages (JavaScript, CSS and Copy (HTML) only)
Note that currently the tool does not deploy the configuration of these artefacts, but only the associated JavaScript, CSS and Liquid content as indicated above.
This allows you to edit JavaScript, CSS and HTML using the full editing power of Visual Studio with tight source-control integration. Having source-control, and using this as the source of truth for your source code, also allows multiple developers to actively work on the system concurrently.
Download
You can download CRMQuickDeploy from the Visual Studio Marketplace.
Support for OnPrem and Online
This tool supports both Adxstudio OnPrem (at the time of writing currently at version 7.0.0.25) and CRM Portal (Online). There are some minor differences in behaviour however depending on the type of artefact being deployed. These are highlighted in the relevant sections below.
Overview of how it works
The tool requires portal artefacts in the Visual Studio project to be placed into specific folders based on the artefact type. For example, web files should be placed in the PortalWebFiles folder, and web templates in the PortalWebTemplates folder, etc.
In most cases, the linkage between a file in Visual Studio and the corresponding record in CRM is by the name of the file in Visual Studio. For example, the file PortalWebPages\Contact Us.css will be deployed as the CSS for the Contact Us web page in CRM.
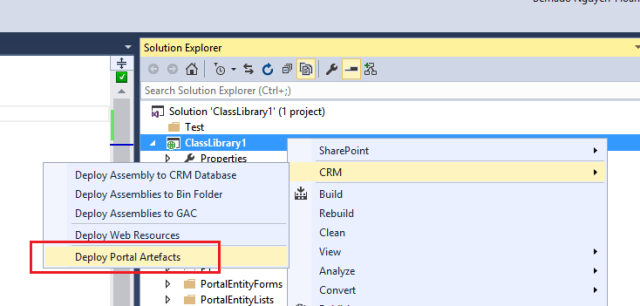
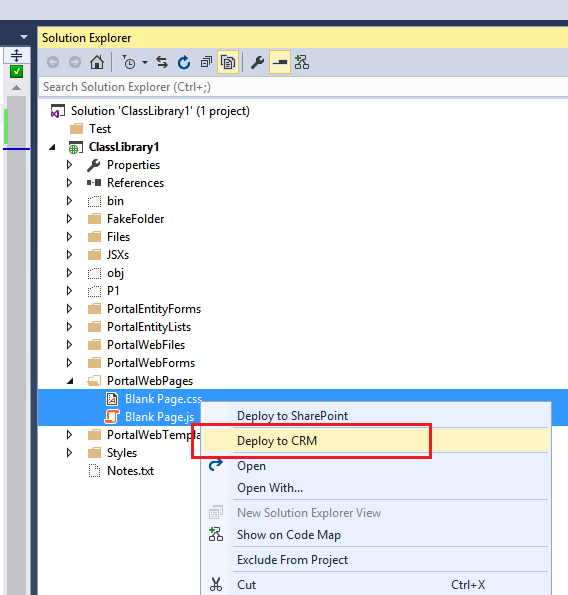
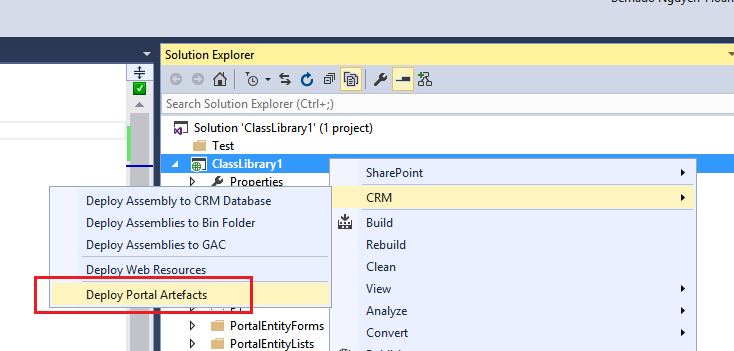
You can deploy an item by:
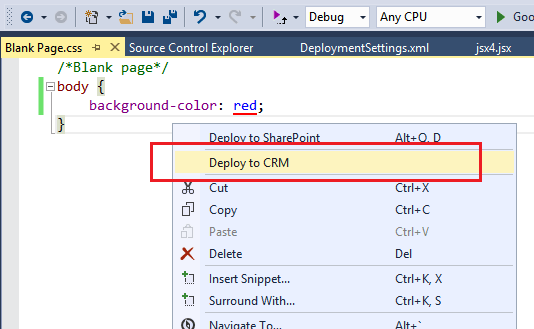
- Right-click in the active code editor and choose Deploy to CRM
- Right-click on one or more files (or a folder) in the Solution Explorer and choose Deploy to CRM

- Right click on the project in Solution Explorer and choose Deploy Portal Artefacts. This will deploy all portal artefacts found within the project.

The deployment behaviour for each artefact type are outlined later in this post, but here’s a summary table:
| Artefact Type | Expected Folder Name | Create or Update? | Linkage to CRM Record |
|---|---|---|---|
| Web page | PortalWebPages | Update only | Via the filename in Visual Studio |
| Web template | PortalWebTemplates | Create and Update | Via the filename in Visual Studio |
| Entity list | PortalEntityLists | Update only | Via the filename in Visual Studio |
| Entity form | PortalEntityForms | Update only | Via the filename in Visual Studio |
| Web form step | PortalWebForms | Update only | Via the filename in Visual Studio |
| Web file | PortalWebFiles | Create and Update | Via a special XML config file in Visual Studio |
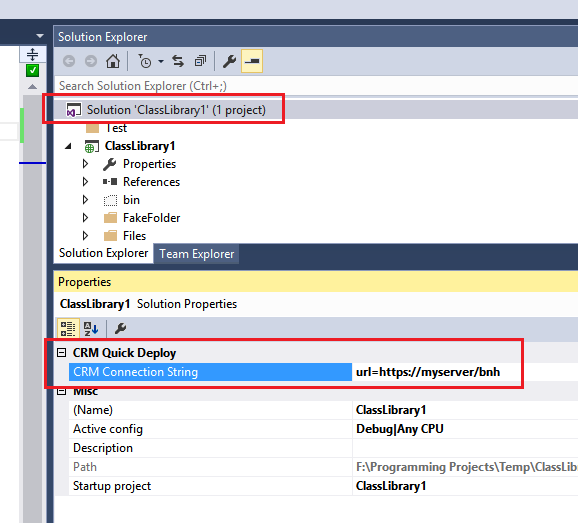
Specifying CRM connection string and target portal website
Similar to previous versions of the tool, the CRM connection string is specified at the solution node in the Solution Explorer:
Some artefact types need to be scoped to a particular website record in CRM. The name of this website record can be specified at the project node in the Solution Explorer:

The rest of this post discusses the deployment behaviour for each artefact type.
Web pages
Web page items should be placed in the PortalWebPages folder at the root level of the Visual Studio project. The tool allows you to update the following fields of the corresponding web page record in CRM with content from files in Visual Studio:
- Copy (HTML)
- Custom JavaScript
- Custom CSS
The filename (without extension) in Visual Studio determines the target web page record. The file extension determines the field to update using the following rules:
- .html or .htm: content of file will be used for the Copy (HTML) field
- .js: content of file will be used for the Custom JavaScript field
- .css: content of file will be used for the Custom CSS field
So for example you may have the following files to update the Contact Us page:
PortalWebPages\Contact Us.html
PortalWebPages\Contact Us.js
PortalWebPages\Contact Us.css
Not all three files must exist. You can include only those that are required.
The tool does not create new web page records. The web page record must already exist in the target CRM, and must be scoped to the website as identified by the Portal Website Name property of the Visual Studio project.
Web templates
Web template items should be placed in the PortalWebTemplates folder at the root level of the Visual Studio project.
The filename (without extension) in Visual Studio determines the target web template record. While any file extension can be used, the native HTML editor in Visual Studio seems to be the best choice for editing Liquid/HTML, and as such the .html or .htm extension is recommended.
So for example you may have the following file to deploy the Dashboard template:
PortalWebTemplates\Dashboard.html
The tool creates the web template if it does not exist.
Note regarding OnPrem vs Online:
In CRM Portal (Online) web templates must be scoped to a website. OnPrem (7.0.0.25) however does not support this. When the deployment target is CRM Online, the tool will use the website identified by the Portal Website Name project property to search for existing web templates. This setting is ignored when the deployment target is OnPrem.
Entity lists and entity forms
Entity list items should be placed in the PortalEntityLists folder at the root level of the Visual Studio project, and entity forms in the PortalEntityForms folder.
The tool allows you to update the following fields of the corresponding entity list/entity form record in CRM with content from files in Visual Studio:
- Custom JavaScript
The filename (without extension) in Visual Studio determines the target entity list/entity form record. The file extension determines the field to update using the following rules:
- .js: content of file will be used for the Custom JavaScript field
So for example you may have the following file to update the Account List entity list:
PortalEntityLists\Account List.js
And the following file to update the Account Edit entity form:
PortalEntityForms\Account Edit.js
The tool does not create new entity list/entity form records. The entity list/entity form record must already exist in the target CRM.
Note regarding OnPrem vs Online:
In CRM Portal (Online) entity lists and entity forms must be scoped to a website. OnPrem (7.0.0.25) however does not support this. When the deployment target is CRM Online, the tool will use the website identified by the Portal Website Name project property to search for existing entity lists/entity forms. This setting is ignored when the deployment target is OnPrem.
Web form steps
Web form step items should be grouped by the parent web forms, and placed in sub-folders of the PortalWebForms folder, which should sit at the root level of the Visual Studio project. The names of the sub-folders are used to identify the parent web form records in CRM.
For example, the following files hold content for the steps Step 1 and Step 2 of the Registration and Feedback web forms.
PortalWebForms\Registration\Step 1.js
PortalWebForms\Registration\Step 2.js
PortalWebForms\Feedback\Step 1.js
PortalWebForms\Feedback\Step 2.js
The tool allows you to update the following fields of the corresponding web form step record in CRM with content from files in Visual Studio:
- Custom JavaScript
The filename (without extension) in Visual Studio determines the target web form step record. The file extension determines the field to update using the following rules:
- .js: content of file will be used for the Custom JavaScript field
The tool only updates existing web form step records, and does not create new records. It also does not update/create web form records.
Note regarding OnPrem vs Online:
In CRM Portal (Online) web forms must be scoped to a website. OnPrem (7.0.0.25) however does not support this. When the deployment target is CRM Online, the tool will use the website identified by the Portal Website Name project property to search for existing web forms/web form steps. This setting is ignored when the deployment target is OnPrem.
Web files
Web file items should be placed in the PortalWebFiles folder at the root level of the Visual Studio project.
The tool creates new or updates existing web files on the target CRM. You define the web files that should be deployed and their key properties (including Name, Parent Page, Partial Url) in a special XML config file, namely DeploymentSettings.xml.
The DeploymentSettings.xml file should be placed in the PortalWebFiles folder, and the tool can automatically generate a skeleton file for you. When you attempt to deploy a web file, the tool offers to create a skeleton DeploymentSettings.xml file for you if one is not found in the expected location.

Only local files identified in the DeploymentSettings.xml file are eligible for deployment as web files. Below is the generated skeleton file with explanation comments and examples:
<DeploymentSettings>
	<!-- Define a collection of items that will be deployed as Web Files and associated with a particular website. -->
	<WebFiles>
		<!-- Separately define each local files to be deployed as Web Files. -->
<!-- -->
<!-- localPath: Required. Relative to the root PortalWebFiles folder of the project. Value should not start with '\'. -->
<!-- targetName: Optional. The name of the web file once deployed. Default to the same value as partialUrl. -->
<!-- parentPage: Required. The name of the parent web page in CRM. -->
<!-- partialUrl: Optional. The partial URL of the web file once deployed. Default to the file name of the Visual Studio item with all spaces removed. -->
<!-- -->
		<File localPath="common.js" parentPage="Home" />
		<File localPath="scripts\script1.js" parentPage="Home" />
		<File localPath="styles\styles.css" targetName="Portal Styles" parentPage="Home" partialUrl="styles.css"/>

		<!-- Define local files to be deployed as Web files using the folder approach. When this approach is used, default value will be used for targetName and partialUrl for each item under the folder. A Folder element only covers the files that are found directly underneath that folder. Separate Folder elements must be defined for each sub-folders. -->
<!-- -->
<!-- localPath: Required. Relative to the root PortalWebFiles folder of the project. Value should not start with '\'. To refer to files directly underneath the root PortalWebFiles, specify an empty string for this attribute, i.e. localPath="". -->
<!-- parentPage: Required. The name of the parent web page in CRM that will be applied to all items under this folder. -->
<!-- targetNamePrefix: Optional. The specified value will be added to the targetName for all items under this folder. -->
<!-- -->
		<Folder localPath="scripts" parentPage="Home" />
		<Folder localPath="styles" parentPage="Home" targetNamePrefix="My Portal - " />
	</WebFiles>
</DeploymentSettings>
As web files must be scoped to a website, the tool uses the website name as identified by the Portal Website Name project property when searching for existing or creating new web files.
Note regarding file type restriction in CRM:
In Adxstudio/CRM Portal web files are essentially created as attachments to notes. Unless a partialUrl value is defined in DeploymentSettings.xml, the attachment will have the same name as the file in Visual Studio (with spaces removed). CRM however by default blocks certain attachment types, including .js. To enable deployment of .js web files, you will need to unblock this type in CRM.
Conclusion
So there you have it, a new set of commands aimed at Adxstudio/CRM Portal developers to help you work more effectively as a team, and sleep a bit easier at night knowing that you source code are safely tucked away somewhere :).
As always, I would love to hear from you with suggestions and feedback.

really helpful tips and very well clarified steps.