Interesting behaviours with enum in .NET

When defining an enum type, we can assign an int value to each of the enum members. Below is an example.

enum Status
{
	Active = 100,
	Inactive = 101
}

Now there are two behaviours that you may not be aware of. Firstly, given the above definition, you can actually assign any int value to a variable of type Status. Let say I have a class as below.

class Record
{
	public Status RecordStatus { get; set; }
}

The following code will then happily compile and execute:

var record = new Record();
record.RecordStatus = (Status)4525424;

OK, who on earth would be doing something like that? Probably not many, but this leads on to the second behaviour: by default, the value of the enum will be 0, even if 0 is not one of the defined enum members.

So with the code below, the value of record.Status will be 0, which does not match any of the defined status values:

var record = new Record();

Console.WriteLine((int)record.RecordStatus); //Display 0
Console.WriteLine(record.RecordStatus == Status.Active); //Display False

This behaviour could have an impact on your code if not handled properly. This is because when defining an enum, we often don’t assign explicit values to the members. We also typically expect record.Status in the code above to default to the first member of the enum. This happens to be correct as the underlying explicit values for enum members start from 0 when not explicitly assigned.

When we assign explicit values however, an uninitialised enum variable no longer equal to any of the defined enum members.

So, the bottom line is, if you assign explicit values to enum members, you should always initialise the enum variable to an appropriate value, for example as below:

class Record
{
	public Record()
	{
		this.RecordStatus = Status.Active;
	}

	public Status RecordStatus { get; set; }
}
Posted in .NET | 1 Comment

Form JavaScript returning incorrect saveMode in CRM – Microsoft bug?

I think I may have found a bug in the internal CRM JavaScript, and it is to do with retrieving the saveMode in form script.

As you may be aware, you can determine the save mode by executing executionObject.getEventArgs().getSaveMode() in form script. The return values that you can expect and their meaning can be found here: https://msdn.microsoft.com/en-us/library/gg509060.aspx.

This bug can be summarised as the saveMode being incorrectly reported if you save the record to correct a validation error while attempting to deactivate a record.

Sounds confusing? Follow these steps to reproduce this bug:

  1. Attach a script to the OnSave event for a form to report the saveMode
  2. Open an Active record
  3. Clear the value for a mandatory field on the form
  4. Deactivate the record. The form reports a validation error and the record is not deactivated.
  5. Enter some value for the mandatory field in step 3
  6. Click Save or Save & Close
  7. The saveMode is incorrectly reported as 5 (Deactivate). It should be 1 (if you clicked Save) or 2 (if you clicked Save & Close)

This bug can be problematic if you have scripts that checks for the saveMode and performs some logic on record deactivation. I haven’t found a workaround yet. This was tested on 2013 SP1 and 2013 SP1 UR1.


Posted in CRM | 1 Comment

Which ID property to use in early-binding programming in CRM?

Have you noticed that the generated early-binding classes always have 2 ID properties? For example, the Account class would have Id and AccountId. The Contact class would have Id and ContactId.

Which property should you use in early-binding programming?

Well, if you are writing a LINQ query, do not use the Id property, and use the AccountId property instead. Using the Id property in your LINQ query will result in an exception with the cryptic message “attributeName“. Digging a bit deeper, you will see that the underlying exception message is “System.ArgumentNullException: Value cannot be null.\r\nParameter name: attributeName.

While in the generated early-binding class both properties are tagged with the [Microsoft.Xrm.Sdk.AttributeLogicalNameAttribute(“accountid”)] attribute, I could only get the LINQ query to work with AccountId. I suspect that the CRM LINQ parser does not look at this attribute when parsing the LINQ query.

Posted in CRM | Leave a comment

Plugin/workflow attribute filtering and updating records via web service (the right way)

Recently we ran into an issue where a workflow configured to run upon changing a particular field was being triggered even though that field was not being updated. In the end it turned out that this was because of the way we were updating the record via the CRM web service. The lesson learnt was quite interesting and I’d like to share it in this post.

Attribute filtering

As you may be aware, when registering an Update plugin, we can configure the attributes that should trigger the plugin. The meaning of this configuration however is often misunderstood.

Take the screenshot below for example.

1 Attribute Filtering


The above configuration does not mean that the plugin will be executed only when the Account Number field is changed. Rather, it means that the plugin will be executed only when the Account Number field is present in the incoming update request. If the Account Number field is present in the incoming update request, the plugin will execute, even if its incoming value is the same as the current value in the database.

So what does ‘present in the incoming update request‘ mean?

When you debug an Update plugin, retrieve the Target entity from the InputParameters collection and have a look at its Attributes collection. An attribute is present in the incoming update request if it exists in this collection.

In the screenshot below, you can see that my incoming update request contains name, telephone1, fax, websiteurl, and a few basic fields that are always passed as part of the request.

2 Attribute Collection

Wait… what does this have to do with workflow?!

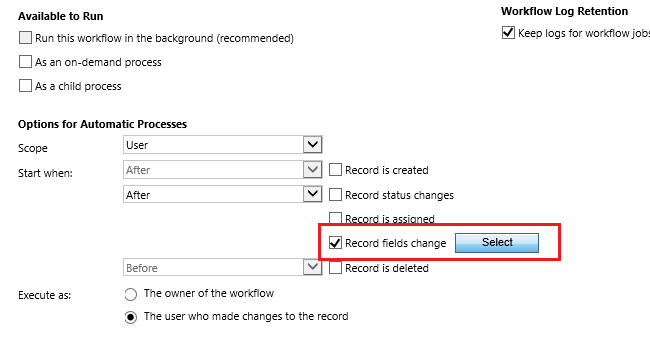
Well, workflow has a similar configuration: it can be started automatically after certain fields have changed.

3 Workflow


Our testing has shown that this configuration actually works the same way as plugin’s attribute filtering: the workflow will be triggered if one of the specified fields is present in the incoming update request.

OK… how is this related to updating records via web service?

When you update the record via the CRM’s UI, it is smart enough to only send through the fields that are dirty (i.e. where the value has changed), which means your plugin’s attribute filtering and workflow automatic trigger will function as one would normally expect.

When you update the record by calling the CRM’s web service however, it is up to you to ensure that only dirty fields are being included in the update request.

Consider the code to retrieve and update an entity below:

var connection = CrmConnection.Parse(ConfigurationManager.ConnectionStrings["CRM"].ConnectionString);
using (var service = new OrganizationService(connection))
{
	var entity = service.Retrieve("account", Guid.Parse("F0A3C092-C076-E411-8111-B86B23AC9F7C"), new ColumnSet(true));

	entity.Attributes["telephone1"] = "1234";

	service.Update(entity);
}

Even though I only updated the telephone1 field after retrieving the entity, this code will cause all fields to be included in the update request, and essentially defeat the purpose of any plugin attribute filtering or workflow automatic trigger you may have configured.

Below is the record’s audit history after the above update. Notice how it lists other fields as ‘Changed Field’ even though the old and new values are the same?

4 Audit History

So how do we fix it?!

The problem with the above code lies in the retrieval of the record (prior to setting the field), specifically the fact that I specified to retrieve all columns using new ColumnSet(true). This causes all fields to be included in the update request, regardless of whether they were touched after the retrieval.

If the code is changed to be:

var entity = service.Retrieve("account", Guid.Parse("F0A3C092-C076-E411-8111-B86B23AC9F7C"), new ColumnSet());

entity.Attributes["telephone1"] = "1234";

service.Update(entity);

then we will find that only the telephone1 field (and a few basic fields that are always passed as part of the update request) are included in the request as expected.

Note that the above code actually specifies to not retrieve any field. This is OK as I am only updating and not reading any field.

But.. what if I need to read and update fields on the same entity?!

Let say you need to set an account’s Fax to be the same as its Telephone. Your code would look something like this:

var entity = service.Retrieve("account", Guid.Parse("F0A3C092-C076-E411-8111-B86B23AC9F7C"), new ColumnSet("telephone1"));

var telephone = entity.Attributes["telephone1"];
entity.Attributes["fax"] = telephone;

service.Update(entity);

Because you included the telephone1 field in the retrieval, and updated the fax field, both of these will be included in the update request. If you have any plugin or workflow that are triggered on changing of the Telephone field, they will now be executed even though you only meant to update the Fax field.

To address this issue, you would need to remove the telephone1 field from the entity after reading its value, like below:

var entity = service.Retrieve("account", Guid.Parse("F0A3C092-C076-E411-8111-B86B23AC9F7C"), new ColumnSet("telephone1"));

var telephone = entity.Attributes["telephone1"];
entity.Attributes["fax"] = telephone;

//Remove this field to ensure that it is not included in the update request
entity.Attributes.Remove("telephone1");

service.Update(entity);

Alright… but how about early-binding?!

When using the CRM web service directly, we can control which fields are retrieved. I haven’t come across a way of doing this with early-binding.

The code to update an entity using early-binding typically looks like the below:

var connection = CrmConnection.Parse(ConfigurationManager.ConnectionStrings["CRM"].ConnectionString);
using (var service = new OrganizationService(connection))
{
	using (var context = new CRMServiceContext(service))
	{
		var accountId = Guid.Parse("F0A3C092-C076-E411-8111-B86B23AC9F7C");
		var account = context.AccountSet.First(a => a.Id == accountId);

		account.Telephone1 = "(02) 6373 8273";

		context.UpdateObject(account);
		context.SaveChanges();
	}
}

The above code will cause all fields to be included in the update request.

There are two options for addressing this in early-binding:

  1. Remove the fields that we are not updating, or
  2. Create a new blank entity and use this to perform the update

Remove the fields that we are not updating

One thing you should know is that the early-binding classes inherit from the Entity class, and therefore still have the Attributes collection. All field values are stored in this collection. This means we could loop through and remove the fields that should not be included in the update request from this collection.

var accountId = Guid.Parse("F0A3C092-C076-E411-8111-B86B23AC9F7C");
var account = context.AccountSet.First(a => a.Id == accountId);

account.Telephone1 = "(02) 6373 0000";

//Remove all fields, except for the one we just updated, to ensure that they are not included in the update request.
var attributesToRemove = account.Attributes.Where(a => a.Key != "telephone1");
attributesToRemove.ToList().ForEach(a => account.Attributes.Remove(a.Key));

context.UpdateObject(account);
context.SaveChanges();


Create a new blank entity and use this to perform the update

The above option works fine, but can get a bit unwieldy when you need to update many fields. The alternative is to create a new blank entity and perform the update on this entity instead. This works because when you create a new blank entity, the Attributes collection is empty. Fields are added to it as you set the properties of the entity. Be sure to set the ID of the new blank entity though, and you will also need to do some Attach/Detach with the context.

Let say again we need to set the Fax of an account to its Telephone. Below is how you would do it with this approach.

var accountId = Guid.Parse("F0A3C092-C076-E411-8111-B86B23AC9F7C");
var retrievedAccount = context.AccountSet.First(a => a.Id == accountId);

var accountForUpdate = new Account()
{
	Id = retrievedAccount.Id
};

accountForUpdate.Fax = retrievedAccount.Telephone1;

//Detach/Attach the object from the context to swap the
//one we retrieved with the one we are going to update
context.Detach(retrievedAccount);
context.Attach(accountForUpdate);
context.UpdateObject(accountForUpdate);
context.SaveChanges();

One other thing…

Did you notice that several fields are always included in an update request? These are the ID field (e.g. accountid), modifiedon, modifiedby, modifiedonbehalfby. This means you should always exclude these fields in your plugin attribute filtering.

Conclusion

Misunderstanding plugin/workflow attribute filtering may see your system executing processes when it should not be. Take care when updating records via the CRM web service, as your code plays a vital part in ensuring your plugin/workflow attribute filtering configuration works as intended.

Posted in CRM | 1 Comment

How to update plugin/workflow assembly in CRM database programmatically

In certain scenarios you might need to update a plugin/workflow assembly deployed to the CRM database programmatically. A good example is for CI build/deployment purposes.

From a CI build/deployment perspective, an issue with deploying the assembly to the database, and promoting the assembly via an exported CRM solution, is that the code checked in into source control may not match the code being deployed via the CRM solution. This is because the export/import of a CRM solution is quite disconnected from the checking in and CI build/deploy of the source code.

To address this issue, we could incorporate a step into the CI deploy process which would programmatically update the assembly in the CRM database using the output of the CI build.

Show me the code!

An assembly is stored in the CRM database as a record, and the entity type is pluginassembly. You can use the Metadata Browser to view the attributes of this entity, but the main ones are:

  • name: for example MyCompany.Project1.Library1
  • version: for example 1.0.0.0
  • publickeytoken: for example ae3b5d802871029c
  • culture: for example neutral
  • content: the actual binary of the assembly is stored in this attribute as Base64 encoded string

Using the first 4 attributes above we can retrieve the assembly record, and then update the assembly binary in the database by updating the content attribute.

Below is the code to retrieve the assembly record for a given assembly on disk, and update its binary in the CRM database. Review the in-code comment.

const string ASSEMBLY_PATH_ON_DISK = @"C:\Output\MyAssembly.dll";

//Use the .NET Framework's AssemblyName class to retrieve the strong name parts for our assembly
var assemblyName = AssemblyName.GetAssemblyName(ASSEMBLY_PATH_ON_DISK);

//Convert the assembly's public key token to a string
var publicKeyTokenString = "";

var token = assemblyName.GetPublicKeyToken();
for (int i = 0; i < token.GetLength(0); i++)
{
	publicKeyTokenString += token[i].ToString("x2");
}

//Now connect to CRM to retrieve the assembly record
var connection = CrmConnection.Parse(ConfigurationManager.ConnectionStrings["CRM"].ConnectionString);
using (var service = new OrganizationService(connection))
{
	//Create a query to retrieve the assembly record matching our assembly's strong name
	var query = new QueryExpression("pluginassembly")
	{
		ColumnSet = new ColumnSet("name", "publickeytoken", "version", "culture"),
		Criteria = new FilterExpression(LogicalOperator.And)
		{
			Conditions =
			{
				new ConditionExpression("name", ConditionOperator.Equal, assemblyName.Name),
				new ConditionExpression("publickeytoken", ConditionOperator.Equal, publicKeyTokenString),
				new ConditionExpression("version", ConditionOperator.Equal, assemblyName.Version.ToString()),
				new ConditionExpression("culture", ConditionOperator.Equal, String.IsNullOrEmpty(assemblyName.CultureName)
					? "neutral"
					: assemblyName.CultureName)
			}
		}
	};

	//TODO: Handle case where matching record was not found
	var assemblyRecord = service.RetrieveMultiple(query).Entities[0];

	//Update the record with the assembly's binary
	assemblyRecord["content"] = Convert.ToBase64String(File.ReadAllBytes(ASSEMBLY_PATH_ON_DISK));

	service.Update(assemblyRecord);
}

Summary

It is possible to programmatically update the binary of a plugin/workflow activity assembly stored in the CRM database. This opens up opportunities in deployment automation, or perhaps development of custom tools.

Posted in CRM | 1 Comment

Introducing a new productivity Visual Studio extension for CRM developers

I have released a new Visual Studio extension that aims to quicken the dev/debug cycles for CRM developers.

1 Menu

This extension allows you to quickly deploy web resources and assembly changes to CRM, and also to attach the debugger to the Async Service, IIS or the Sandbox Worker process using keyboard shortcuts.

Regarding assembly deployment, the intention is to only deploy binary changes. The tool therefore does not deal with assembly or plugin step registration in CRM. To use the deploy assembly commands, you would need to first register the assembly with CRM using other tools (e.g. the Plugin Registration tool).

Below is a description of the actions performed by each of the command.

Note that most of the commands below require you to run Visual Studio under an account with local administrator permissions.

Deploy Assemblies to Bin Folder (Alt + D, B)

  • Builds the solution’s StartUp project
  • Recycles the CRM app pool and restarts the Async Service to release locked files
  • Copies the StartUp project output files to the CRM’s bin folder on the local machine

Deploy Assembly to CRM Database (Alt + D, D)

  • Builds the solution’s StartUp project
  • Connects to CRM (using configured connection string) and upload the project’s main output file to the CRM database
  • Copy the debug file (i.e. the .PDB file) of the project’s main output to CRM’s bin folder on the local machine

This command connects to CRM using a connection string. This is set by a property at the solution level in the Solution Explorer.​

Setting

This command only deploys the project’s main output, i.e. single assembly. All other files are ignored.

Deploy Assemblies to GAC (Alt + D, G)

  • Builds the solution’s StartUp project
  • Install all DLLs found in the project’s output folder to the local computer’s GAC
  • Recycles the CRM app pool and restarts the Async Service to ensure the new binaries are picked up

Deploy Web Resources (Alt + D, W)

  • Saves and deploys files under the WebResources folder of the StartUp project as web resources
  • Publishes the web resources

This command looks for files under a folder named WebResources and connect to CRM (using the specified connection string) to upload them as web resources. The name of the web resource in CRM is determined by the folder structure of the file within the project. Below are some examples of how the CRM name will be determined.

  • If the file is located at WebResources\new_script.js – the CRM name will be new_script.js
  • If the file is located at WebResources\bnh_scripts\account.js – the CRM name will be bnh_scripts/account.js.

Note that CRM requires the name to have a prefix so ensure that you include this in the folder names (for nested files) or file names (for files directly under the WebResources folder).

The web resource type is determined base on the file extension. Files with unrecognised extensions are ignored.

Web resources are created if they do not already exist in CRM, otherwise they are updated.

Attach to Async Service (Alt + A, A)

  • Attach the debugger to the Async Service on the local machine

Attach to IIS (Alt + A, I)

  • Attach the debugger to the CRM app pool on the local machine

Attach to Sandbox Worker Process (Alt + A, S)

  • Attach the debugger to the Sandbox Worker Process on the local machine

Please note that to debug Sandbox plugins, you will need to make a change in the Registry to disable the shutdown of the Sandbox Worker process as detailed here: https://msdn.microsoft.com/en-us/library/gg328574.aspx#bkmk_sandboxplugin.

Limitations

This extension works best when you are developing against a local CRM server. The following commands will not work, or partially work, if you are not developing against a local CRM server:

  • Deploy Assemblies to Bin Folder
  • Deploy Assemblies to GAC
  • Deploy Assembly to CRM Database – the assembly will be updated in the CRM database, but the debug file will not be copied to the CRM’s Bin folder.
  • Attach to Async Service
  • Attach to IIS

Download

You can download the extension from Visual Studio Gallery using this link.

Posted in CRM | 7 Comments

‘Plug-in assembly does not contain the required types or assembly content cannot be updated.’ when importing CRM solution

I was importing a simple solution with a few plugins into my Test environment and got this error message:

Plug-in assembly does not contain the required types or assembly content cannot be updated.

Apparently this can occur for a number of reasons, and is a common issue for people. These links describe some of the common causes:

https://community.dynamics.com/crm/b/gonzaloruiz/archive/2012/08/29/crm-2011-plug-in-assembly-does-not-contain-the-required-types-or-assembly-content-cannot-be-updated.aspx

http://crm2011corner.blogspot.com.au/2014/02/crm-2011-plug-in-assembly-does-not.html

In my case it was because the plugin DLL was set to deploy using Disk mode. Because it was deployed using Disk mode, the DLL does not exist in the CRM DB in my Dev environment. Therefore, when I exported the solution from Dev, the DLL is actually not added to the solution. If you look inside the solution ZIP file, you will see that the DLL file is actually 0KB in size. This is why when CRM attempts to import this solution to a new instance, it cannot read the DLL and therefore complains.

To fix this I copied the plugin DLL from Dev in the C:\Program Files\Microsoft Dynamics CRM\Server\bin\assembly folder to the same location in Test.

It is also interesting to note that CRM also looks for the plugin DLL when you attempt to delete the registered steps, and will give a similar error message if the DLL cannot be found.

Posted in CRM | Leave a comment

Showing the ‘records associated with this view’ button for sub-grids in CRM

Sub-grids on CRM forms typically have a button that takes you to a view showing all records associated with the main record, as shown below.

1 Associated View

Have you ever wondered how to remove this button or add it back?

The visibility of this button is actually controlled by the navigation links on the main record’s form. For example, you added a sub-grid of Connections to the form for Account. If you then edit the form for Account, and remove the Connections relationship from the navigation links, then the ‘view records associated’ button for the Connections sub-grid would also be removed. Adding the relationship back to the navigation links would bring the button back.

Posted in CRM | 4 Comments

Connector for Dynamics: ‘Could not find key [ID field] in Dictionary for entity’ when mapping to custom entity in CRM

Using the Connector for Dynamics I was mapping an entity in GP 2010 to a custom entity in CRM 2013. In this case the schema name of my custom CRM entity is ng_courseinvoice (the display name is Course Invoice). When the map is executed, I get the error message below:

Could not find key “ng_courseinvoiceid” in Dictionary<string, object> for entity “ng_courseinvoice”

I fixed this by updating my map and set the Course Invoice field to the CreateGuid() function. This creates a new ID for the entity.

0 Mapping

I have done some testing and there seems to be some smart in the Connector to handle the update case. This means even though you have specified CreateGuid(), the record in CRM will not receive a new ID when it is updated by the Connector as a result of a change in GP.

As a side note, it is important to map the Integration Key field for the destination CRM record. This field is added to the entity by the Connector’s CRM Adapter Configuration Utility. The Connector uses this field to track GP records against CRM records and keep them in sync. You should set this field to an ID field of the source record in GP (I used Sales Invoice Number\Sales Order ID for Sales Invoice for example). Failing to do so will cause the Connector to create a new CRM record for the corresponding GP record for each update in GP.

Lastly, it is interesting to note that The Connector generates C# code to apply the mapping to the record. Below is the generated code to map the main fields of the destination record in CRM. Value for the ng_courseinvoiceid key was only added after I updated my map as above.

private System.Collections.Generic.Dictionary<string, object> _(Microsoft.Dynamics.Integration.Adapters.Gp2010.GPWebService.SalesInvoice source)
        {
            System.Collections.Generic.Dictionary<string, object> _ = new System.Collections.Generic.Dictionary<string, object>();
            _["ng_accountid"] = this.ng_accountid(source);
            _["ng_amount"] = this.ng_amount(source);
            _["ng_courseinvoiceid"] = Microsoft.Dynamics.Integration.Mapping.Helpers.GeneralMappingHelper.CreateGuid();
            _["ng_name"] = ( ((source != null)
            && (source.Key != null)) ? source.Key.Id : default(string) );
            return _;
        }
Posted in CRM, Dynamics Connector, Dynamics GP | Leave a comment

‘Could not load file or assembly ‘Microsoft.Interop.Security.AzRoles, Version=1.2.0.0…’ when installing GP 2010 Web Services

I was installing GP 2010 Web Services on a Windows Server 2012 R2 and received the error below:

System.IO.FileNotFoundException: Could not load file or assembly ‘Microsoft.Interop.Security.AzRoles, Version=1.2.0.0, Culture=neutral, PublicKeyToken=31bf3856ad364e35’ or one of its dependencies. The system cannot find the file specified.

File name: ‘Microsoft.Interop.Security.AzRoles, Version=1.2.0.0, Culture=neutral, PublicKeyToken=31bf3856ad364e35’

I looked in the GAC and I have version 2.0.0.0 installed, but not 1.2.0.0. Someone posted a solution that upgrading to GP 2010 SP 2 fixes the problem, but I was already running SP 3. Other people running SP 4 were also experiencing the issue.

The two possible solutions I could think of was to do an assembly redirect to 2.0.0.0 (not safe), or somehow install 1.2.0.0 on my system.

To get a copy of version 1.2.0.0 of this DLL, download the Windows 2000 Authorization Manager Runtime from this link: http://www.microsoft.com/en-au/download/details.aspx?id=13225.

This is a self-extracting package that creates a folder in the current location when you run it. Within this folder, you can find the DLL in the PIA\1.2 folder. Install this DLL into the GAC and the installation should work.

After the installation has completed, you should verify that the Web Services are working correctly following the steps in this article: http://support.microsoft.com/kb/950844.

Posted in Dynamics GP | Leave a comment