Retrieving related records in an N:N relationship using QueryExpression in CRM

This post explains how the QueryExpression class can be used in conjunction with IOrganizationService.RetrieveMultiple() in CRM 2013 to retrieve related records for an entity in an N:N relationship. This is something that I could not find much documentation on, and it is not very straightforward – at least for someone starting out in CRM dev.

Scenario

I have two custom entities that have an N:N relationship between them: Course (logical name ng_course) and Subject (logical name ng_subject). The relationship is named ng_course_subject. The query that I need to write is to retrieve all Subjects assigned to a given Course.

Understanding QueryExpression and LinkEntity

The QueryExpression class is where you define your query. You can learn more about this class here: http://msdn.microsoft.com/en-us/library/microsoft.xrm.sdk.query.queryexpression(v=crm.6).aspx.

The key property of this class that enables us to retrieve the related records is the LinkEntities property, which is a collection of LinkEntity objects. Essentially LinkEntity allows us to perform inner joins in our query.

The LinkEntity class contains 4 properties that specify the nature of the join – i.e. they specify the related records that we would like to retrieve. These properties are:

  • LinkFromEntityName
  • LinkFromAttributeName
  • LinkToEntityName
  • LinkToAttributeName

Knowing the right values to set for these 4 properties were the trickiest part, and for that we need to understand how CRM stores N:N relationship in the background.

Understanding how N:N relationships are stored

When you create an N:N relationship, CRM creates a hidden entity to store the associations. This is pretty much how you would also do it if you were working on a traditional database.

The name of this entity is the same name as the relationship, i.e. ng_course_subject in our scenario. The attributes of this entity includes the ID of the entities participating in the N:N relationship. If you install the Metadata Browser solution, you will be able to see this hidden entity and its attributes – as shown below.

1 Hidden entity

…and its attributes – notice the 2 keys attributes ng_courseid and ng_subjectid.

2 Attributes

Completing the code for QueryExpression and LinkEntity

Now that you understand how N:N relationships are stored, it should be easier to understand the values we need to provide to LinkEntity to retrieve our related records.

As I am needing to retrieve Subject records, the join that I need to perform is from ng_subject to the hidden entity, i.e. ng_course_subject. The join will be performed on the ID column of ng_subject (i.e. ng_subjectid) and the corresponding column in ng_course_subject (i.e. also ng_subjectid). We will use the remaining ID column in ng_course_subject (namely ng_courseid) to filter the related records down to only those for a given Course.

So the values that we need for LinkEntity are as follow:

  • LinkFromEntityName: ng_subject
  • LinkFromAttributeNameng_subjectid
  • LinkToEntityName: ng_course_subject
  • LinkToAttributeName: ng_subjectid

Note that the names are logical names, not schema names.

To filter the related records down to only those for a given Course, we will use the LinkCriteria property of LinkEntity.

Below is the complete code to setup and perform this query.

//Credentials for invoking the service
var credentials = new ClientCredentials();
credentials.UserName.UserName = "mydomain\\user1";
credentials.UserName.Password = "password1";

var organisationUrl = new Uri("http://nguyen5:5555/NguyenOrg/XRMServices/2011/Organization.svc");
var service = new OrganizationServiceProxy(organisationUrl, null, credentials, null);

//This will be used to demonstrate filtering
var courseID = "7CF5E251-30C1-E311-84ED-00155DAB7703";

var query = new QueryExpression()
{
	//Set this to ng_subject as we need to retrieve Subject records
	EntityName = "ng_subject",

	//This will return us all columns for each Subject records
	ColumnSet = new ColumnSet(true),
};

//This is a shortcut method for adding LinkEntity objects to the query. The LinkFromEntityName is default to the
//EntityName of the parent query. Note that logical names are used, not schema names.
var link = query.AddLink("ng_course_subject", "ng_subjectid", "ng_subjectid");
link.LinkCriteria = new FilterExpression()
{
	//Add this to filter the Subject records for a specified Course
	Conditions =
	{
		new ConditionExpression("ng_courseid", ConditionOperator.Equal, courseID)
	}
};

//Invoke the service with our query
var subjectEntities = service.RetrieveMultiple(query);

//Loop through the result
for (var i = 0; i < subjectEntities.Entities.Count; i++)
{
	Console.WriteLine("Name: {0}, ID: {1}", subjectEntities[i]["ng_name"], subjectEntities[i]["ng_subjectid"]);
}
Posted in CRM | 8 Comments

Form notification with timeout in CRM 2013

Form and field notification are new to CRM 2013 and there have already been quite a few posts about these. I was playing around with form notification and wanted to display an Info notification that would automatically go away after a few seconds. This is a common nice to have for informational messages.

This actually was pretty simple to achieve using the standard setTimeout function. Below is the generic script for achieving this.

var BNH = BNH || {};
BNH.FormNotification = (function() {
	return {
		setAutoRemovedNotification: function (message, id, displayDurationSeconds) {
			Xrm.Page.ui.setFormNotification(message, 'INFO', id);

			setTimeout(function () {
				Xrm.Page.ui.clearFormNotification(id);
			}, displayDurationSeconds * 1000);
		}
	};
}());

Invoke this with the code below.

BNH.FormNotification.setAutoRemovedNotification('Hello world!', 'MY_MESSAGE', 5);

The only minor issue is that by default the notification is displayed inline with the form. Form content is therefore pushed down when the notification appears, and moved up when it is removed – which may slightly disrupt the user. It’d be nice to apply some CSS to float the notification on top of the form content.

Posted in CRM | Leave a comment

CRM 2013: Web.config error (HTTP 500.19) after installing .NET Framework 4.5

I had a vanilla installation of CRM 2013 running smoothly on Windows Server 2008 R2. I installed Visual Studio 2013, which adds .NET Framework 4.5. I then started getting the error below when browsing to CRM:

HTTP Error 500.19 – Internal Server Error

The requested page cannot be accessed because the related configuration data for the page is invalid.

The actual config error is:

The configuration section ‘system.web.extensions’ cannot be read because it is missing a section declaration

I fixed this with the steps below:

  1. Change the CRMAppPool in IIS to use .NET Framework 4.0
  2. Enable ASP.NET v4.0 for the server by:
    1. Clicking on the server name in IIS
    2. Click ISAPI and CGI Restrictions under the IIS section
    3. Allow ASP.NET v4.0 (x64)
Posted in CRM | Leave a comment

How to update SharePoint web.config for ASP.NET ReportViewer control

If you have been trying to use the ASP.NET ReportViewer control in your SharePoint project then you may have found that you need to make several changes to the web.config, including:

  • Remove the existing ReportViewerMessages appSettings
  • Remove the existing ReportViewerWebControl handler
  • Add a new ReportViewerWebControl handler, which references a later version of the DLL than the existing entry above

(Refer to this article for more details on these changes).

A challenge this poses is how to apply these changes in a proper way. SharePoint gives you two options for doing this: using the SPWebConfigModification class, or the supplemental web.config approaches.

Adding the new handler is not difficult. It is the removal of the existing handler and appSettings key that is the problem. This is because the SPWebConfigModification class allows to you add a node to the web.config, but does not allow you to remove one. The supplemental web.config approach does not allow you to target the changes to a particular web app, which is not ideal in this scenario.

After experimenting with several different things and being very close to giving up , it dawned on me that we can use the collection features of the .NET configuration framework to remove the existing handler and appSettings key.

This means that rather than literally remove these nodes from the web.config, we can use the SPWebConfigModification class to add the node <remove name=”ReportViewerWebControl” /> to the handlers section, and the node <remove key=”ReportViewerMessages” /> to the appSettings section. I tested it and this approach works perfectly! Woohoo!

I have included the PowerShell script for this at the end of this article. In case you are wondering why we shouldn’t just manually apply these changes, here are some reasons:

  • You will need to repeat the changes on all SharePoint servers. This is time consuming and error prone.
  • Your manual changes may be lost where configuration or maintenance tasks are performed on the web app, or when a SharePoint patch/update is applied. This is because these tasks may update the web.config, in which case SharePoint will re-apply only the changes it knows about. SharePoint will not know about your changes if they were applied manually.
  • Your manual changes may be lost when someone else deploys web.config changes to the web app using SPWebConfigModification (as they should).
  • Your manual changes will need to be applied to each new server added to the farm. This is sometime done by the server admins without informing the dev team. As a result, your application may randomly fails in a load-balanced environment.
$webApp = Get-SPWebApplication "http://mySite"
$webAppService = $webApp.Farm.Services | Where { $_.TypeName -eq "Microsoft SharePoint Foundation Web Application" }

$modificationOwner = "MYAPP";

##Remove appSettings key 'ReportViewerMessages'
$configModification = New-Object "Microsoft.SharePoint.Administration.SPWebConfigModification"
$configModification.Owner = $modificationOwner
$configModification.Path = "configuration/appSettings"
$configModification.Name = "remove[@key='ReportViewerMessages']";
$configModification.Type = 0 ##EnsureChildNode
$configModification.Value = "<remove key='ReportViewerMessages'/>"
$webApp.WebConfigModifications.Add($configModification)

##Remove handler name 'ReportViewerWebControl'
$configModification = New-Object "Microsoft.SharePoint.Administration.SPWebConfigModification"
$configModification.Owner = $modificationOwner
$configModification.Path = "configuration/system.webServer/handlers"
$configModification.Name = "remove[@name='ReportViewerWebControl']";
$configModification.Type = 0 ##EnsureChildNode
$configModification.Value = "<remove name='ReportViewerWebControl'/>"
$webApp.WebConfigModifications.Add($configModification)

##Add handler name 'ReportViewerWebControlHandler'
$configModification = New-Object "Microsoft.SharePoint.Administration.SPWebConfigModification"
$configModification.Owner = $modificationOwner
$configModification.Path = "configuration/system.webServer/handlers"
$configModification.Name = "add[@name='ReportViewerWebControlHandler']";
$configModification.Type = 0 ##EnsureChildNode
$configModification.Value = "<add name='ReportViewerWebControlHandler' preCondition='integratedMode' verb='*' path='Reserved.ReportViewerWebControl.axd' type='Microsoft.Reporting.WebForms.HttpHandler, Microsoft.ReportViewer.WebForms, Version=11.0.0.0, Culture=neutral, PublicKeyToken=89845dcd8080cc91' />"
$webApp.WebConfigModifications.Add($configModification)

$webApp.Update()
$webAppService.ApplyWebConfigModifications()
Posted in Report Viewer, SharePoint | Leave a comment

How to add links with query string to Quick Links/Current Navigation using code

In SharePoint 2010 you will find that you can add links with query string to Quick Links (aka Current Navigation) using the UI without any issue. If you enter something like http://mySite/pages/myPage.aspx?key=abc into the dialog, then it’d happily accept it.

If you tried doing this by code however, you may find that the link is saved, but the query string is removed. To achieve this with code, you will need to add a key to the link’s Properties bag after it has been created. Below is the code for doing this.

using (var site = new SPSite("http://mySite"))
{
    using (var web = site.OpenWeb())
    {
        var newNode = new SPNavigationNode("My Link", "pages/myPage.aspx");
        newNode = web.Navigation.QuickLaunch.AddAsFirst(newNode);
        newNode.Properties.Add("NodeType", "AuthoredLinkPlain");
        newNode.Properties.Add("UrlQueryString", "key=abc");
        newNode.Update();
    }
}

The magic key is UrlQueryString.

Note that when you add a link as the top level link by code, it will default to the Heading type. To add it as the Link type, you will need to add the NodeType key to the Properties bag. I have written about this here.

If you examine the Properties bag of an existing link added via the UI, you will find other interesting keys, such as the target for the link.

Posted in SharePoint | 1 Comment

Connecting to SQL from SharePoint with claims based authentication and integrated security

Recently I had to retrieve data from SQL Server and display in a SharePoint portal. Data security trimming was implemented in SQL, which means I needed to connect to SQL using the current user’s identity.

ASP.NET impersonation is enabled by default in SharePoint. If your web application uses classic mode authentication, then all you need to do is specify integrated security in your SQL connection string and all will work.

If your web application uses claims based authentication however, then integrated security will not work at the SQL end. You will see your code connects as NT Authority\IUSR. This is because SQL Server does not support claims authentication (including SQL Server 2012). The claims identity is unable to be passed to SQL.

To overcome this, we need to convert the claims identity to a Windows identity, and connect to SQL under this Windows identity. The Claims to Windows Token Service (C2WTS) on the SharePoint machine is what enables us to convert a claims identity to a Windows identity.

You invoke the C2WTS via the S4UClient class. This class has two methods, UpnLogon and CertificateLogon. Below is an example of using the UpnLogon method to create a Windows identity from the current claims identity, and connect to SQL under this Windows identity. You will need to add a reference to Microsoft.IdentityModel.dll.

private void QuerySql()
		{
			var windowsIdentity = GetWindowsIdentityFromCurrentClaimsIdentity();
			using (windowsIdentity.Impersonate())
			{
				//Connect to SQL here
			}
		}

		private WindowsIdentity GetWindowsIdentityFromCurrentClaimsIdentity()
		{
			WindowsIdentity windowsIdentity = null;

			//This is required when invoking the C2WTS
			SPSecurity.RunWithElevatedPrivileges(delegate()
			{
				//Get the UPN of the user from the current claims identity
				var claimIdentity = (ClaimsIdentity)Thread.CurrentPrincipal.Identity;
				var upnClaim = claimIdentity.Claims.FirstOrDefault(c => c.ClaimType.Equals(ClaimTypes.Upn, StringComparison.InvariantCultureIgnoreCase));

				//TODO: Ensure that we found the UPN claim

				string upn = upnClaim.Value;

				//Get a WindowsIdentity from the UPN of the user by calling C2WTS service
				try
				{
					windowsIdentity = S4UClient.UpnLogon(upn);
				}
				catch (Exception ex)
				{
					//TODO: Handle
					throw;
				}
			});
			return windowsIdentity;
		}

Note that the claims identity will not contain a UPN claim if your farm is not joined to an AD domain.

Posted in Claim Authentication, SharePoint | Leave a comment

How to debug OOTB minified JavaScript in SharePoint

When time gets desperate you may need to debug into SharePoint’s OOTB JavaScript to work out a particular problem. The challenge here is that the OOTB JavaScript are minified, which makes debugging almost impossible.

This post describes three approaches you can use to overcome this. To be clear, we are talking about debugging these JavaScript using the browser’s developer tools.

1. Instruct SharePoint to use the debug version of the JavaScript

You can achieve this by modifying either the site’s web.config or masterpage. This approach therefore is only possible if you have control of the site, e.g. in a Dev or Test environments.

Note that you only need to modify either the web.config, or the masterpage, not both.

Modifying the web.config

The web.config contains an element as below:

<compilation batch="false" debug="false">

Set the debug attribute to true and SharePoint will use the debug version of its JavaScript.

Modifying the masterpage

The masterpage typically has a ScriptManager control that manages script references for the page. This control has a ScriptMode attribute, which if set to Debug will cause SharePoint to use the debug version of its JavaScript.

2. Using Pretty Print feature of your browser’s developer tools

Below is what a minified JavaScript typically looks like in the browser’s developer tools.

1 Minified JS

The file above is the OOTB init.js, which has thousands of lines of code – but is compressed down to a few lines in the minified version. There are three problems with debugging a minified file such as this:

  • It is impossible to set a breakpoint on the right line of code
  • Text searching, e.g. for a particular function name, is very slow
  • Variable names are replaced with a, b, c, d, etc.

You can overcome the first two problems by turning on Pretty Print (as it is called in Chrome) in the browser’s developer tools. In Chrome, this is the { } icon as shown below.

2 Pretty Print

Below is the same init.js with Pretty Print enabled:

3 Debug JS

You can now set breakpoints, and text search performs as you would normally expect.

You may notice that variable names are still a, b, c, d, etc. To overcome this you can open the corresponding debug version of the file on your local machine under the SharePoint root, e.g. init.debug.js, and cross-reference with this file. This is not perfect, but may be sufficient for simple debugging.

3. Using Fiddler to intercept minified JavaScript and serve debug version

Fiddler is a free tool that monitors web requests from your computer. It has a feature that allows you to intercept requests to a specified URL and serves up to your browser an alternate local file instead of the requested URL.

The steps below configure Fiddler to intercept requests for a minified JavaScript (init.js in this example), and serves up the corresponding debug version from our SharePoint root.

  1. In your browser, browse to the SharePoint page containing the script you would like to debug
  2. Launch your brower’s developer tools and determine the URL of the script you would like to debug. The screenshot below shows how I did this using Chrome.4 Get JS Url
  3. Launch Fiddler
  4. On the right hand side, click the AutoResponder tab
  5. Tick Enable automatic responses
  6. Tick Unmatched requests passthrough
  7. Click the Add Rule button
  8. In the Rule Editor section at the bottom of the tab, enter EXACT:[minified script URL] in the first drop down. Browse for the corresponding debug version of the script on your local machine in the second drop down.
  9. Click Save. The screenshot below illustrate these steps:5 Fiddler

Now refresh the page in your browser. In your browser’s developer tools, even though the URL of the script being requested is still the minified version, the content being served to your browser should now be the debug version, as shown below.

6 Intercepted

Conclusion

The three approaches above allow you to debug OOTB JavaScript in SharePoint which are minified. Choose the approach that best suit the level of control you have of the site, and how deep you need to debug into the OOTB code.

Posted in JavaScript, SharePoint | Leave a comment

Cannot login with FBA and AD LDS: The security token username and password could not be validated

I configured FBA and AD LDS in SharePoint 2010 and was able to grant permissions to AD LDS users in SharePoint. I however could not login with these users. The ULS shows multiple errors similar to below:

An exception occurred when trying to issue security token: The security token username and password could not be validated..

and

SPSecurityTokenService.Issue() failed: System.ServiceModel.FaultException`1[Microsoft.IdentityModel.Tokens.FailedAuthenticationException]: The security token username and password could not be validated. (Fault Detail is equal to Microsoft.IdentityModel.Tokens.FailedAuthenticationException: The security token username and password could not be validated.).

It turns out that it was because the STS did not have read access to the AD LDS user store. On my dev machine the STS is running under LocalSystem as shown below.

1 App pools

In AD LDS, by default there are three roles, Administrators, Readers and Users, as shown below.

2 Roles

Adding the STS app pool account to the Administrators or Readers role fixed the issue.

Another issue that could cause login to fail is that the user account is disabled. In AD LDS the user account is disabled by default when you create them. I have written about this here.

Posted in AD LDS, Form Based Authentication, SharePoint | 1 Comment

Choosing between InfoPath Form Library and InfoPath List Form

Recently I had to decide between InfoPath Form Library and InfoPath List Form. We first ventured down the Form Library path, but due to certain issues, we ended up re-doing the solution using List Form. This post summarises the issues we encountered.

Please note that this is all in the context of browser-enabled forms with no code behind.

First of all, the MS InfoPath team has written an article that compares Form Library and List Form. You definitely should check out this article.

1. Must generate your own unique file name with Form Library

With Form Library, your submitted data is saved as an XML document in a SharePoint library. You will need to build custom logic in the form to generate a unique file name for each XML document (i.e. the submitted form instance). The degree of complexity of this task depends on how you want the file name to be generated. For example, if it is to be based on the current user ID and the current time, then it is quite straightforward. However, if it is to be based on a sequential number, e.g. Request-1.xsn, Request-2.xsn, etc., then it would be more complicated – as your form may need to query an external source (e.g. the SharePoint library) to determine the next number to use.

With List Form, your submitted data is saved as a SharePoint list item. The unique list item ID is automatically generated by SharePoint and your form does not need to worry about it.

2. Majority of site branding is removed with Form Library

Below is the screenshot of viewing a submitted form in a Form Library:

1 Form Library Form

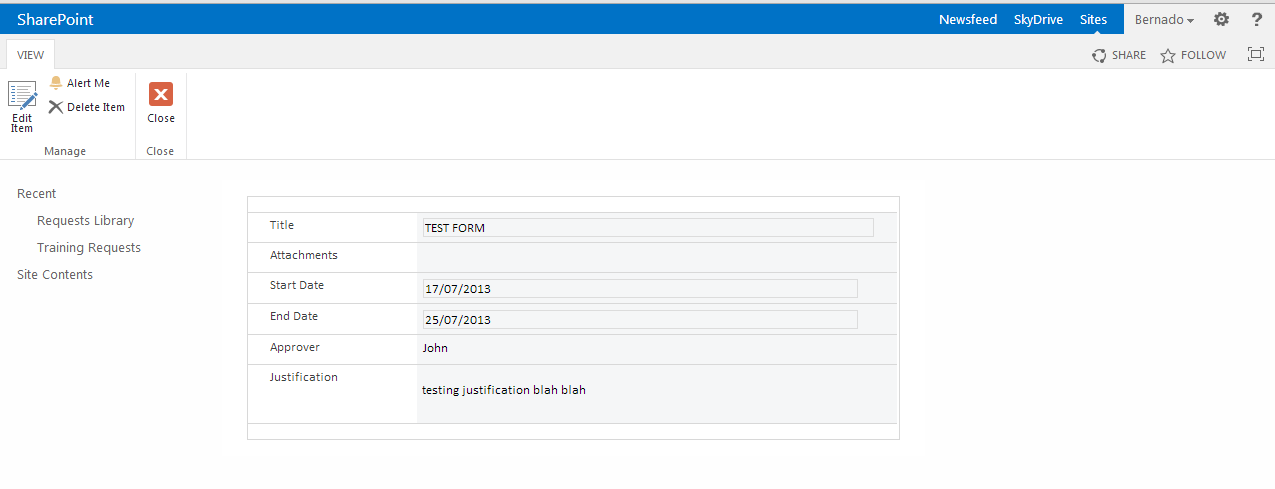
And now is the screenshot of viewing a submitted item in a list with InfoPath List Form:

2 List Form Form

The list and the library are in the same site, and the site uses OOTB branding.

Note that the left nav and the top link bar are removed from the Form Library (and the global nav is removed from both). The stripped back look of the Form Library may appear to users as if they have left the site. I have done some research and could not find any sensible way to make the Form Library retains some of the site’s branding elements.

3. Poor user experience in restricting Edit access with Form Library

This is one of the reasons that made us abandon the Form Library approach.

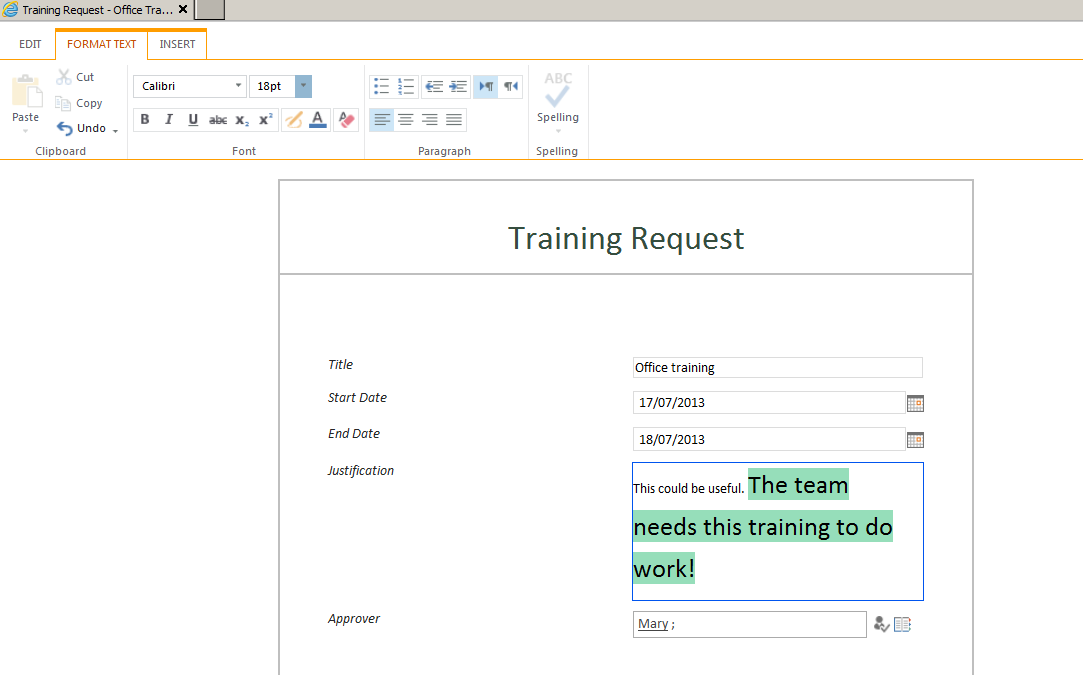
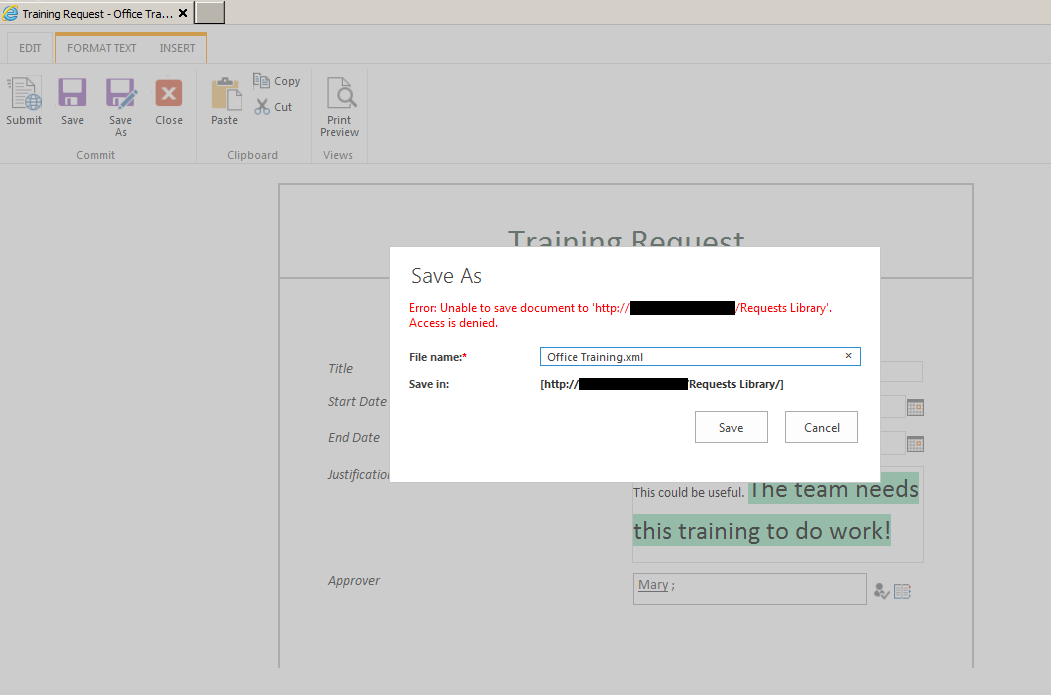
Form Library allows read-only users to edit the form. Only when the user attempts to save the changes, does the Form Library reports an access denied error. This is quite a poor user experience. This is illustrated in the screenshots below.

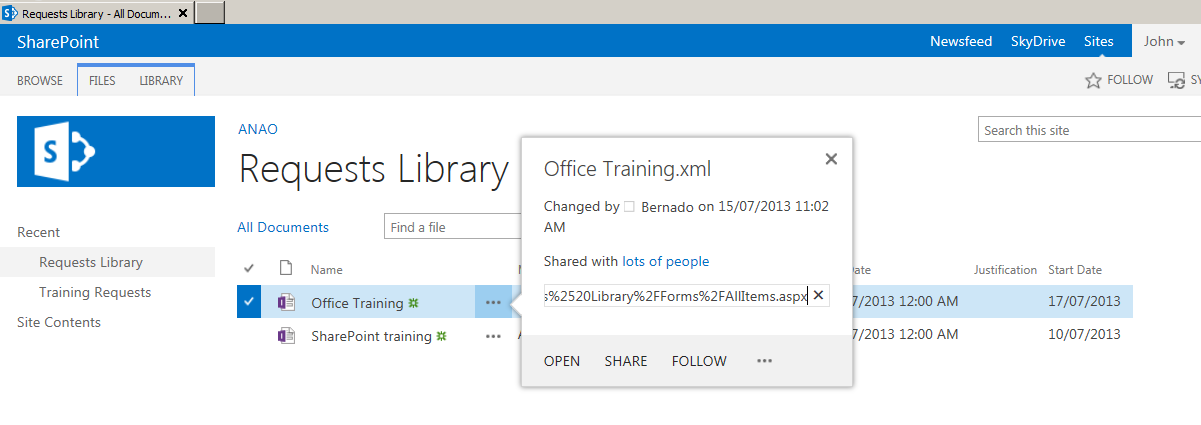
Below I have logged in as a read-only user and selects a submitted form in the library. Note how Edit does not appear as an option on the callout menu (this is good).

3 Read Only Form Library Item Select

Below I have clicked the item link to open the form. This form actually opens in edit mode and I, as the read-only user, can make changes to all fields. I edited the text in the Justification field.

3 Read Only Form Library with Edit

Below is the error message I received when attempting to save the changes.

4 Read Only Form Library with Error

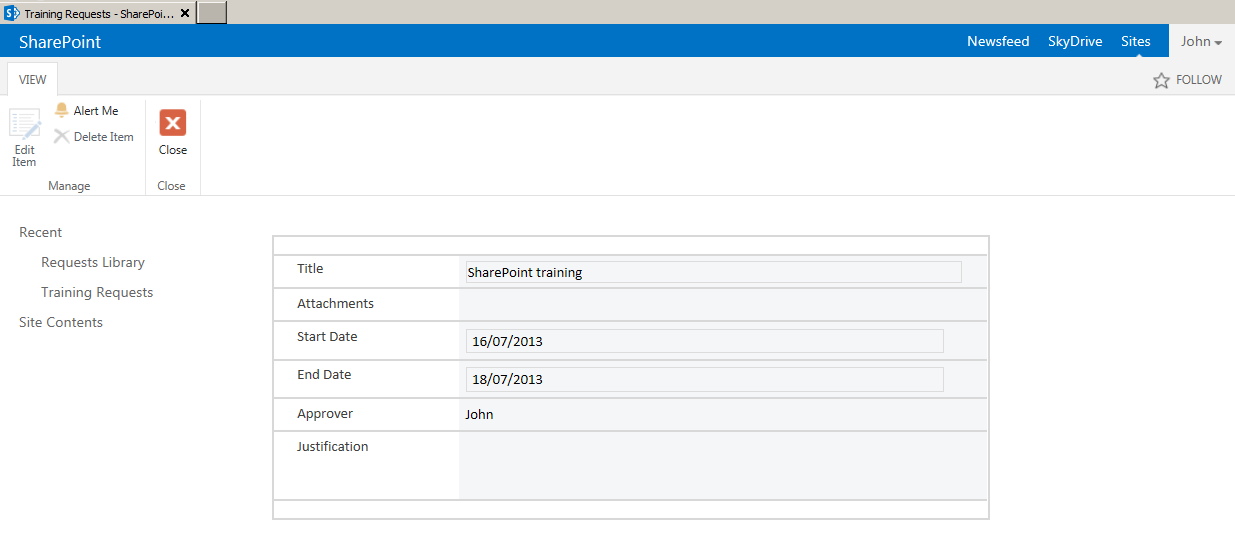
With List Form, the user experience is much better.

Below I have logged in as a read-only user and click to view a submitted item. The form opens in read-only mode. The Edit button is disabled on the ribbon just as you’d expect.

5 Read Only Form with List Form

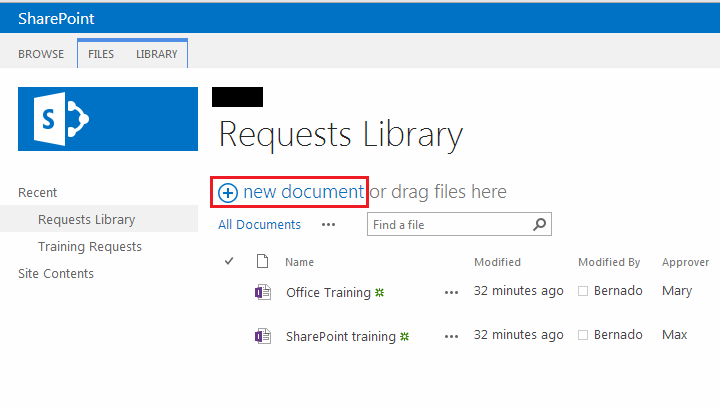
4. New Document link on Form Library can be confusing to users

6 New Document LinkClicking the new document link above will actually open the upload page and allow the user to browse for documents on his/her local machine. This may be confusing for users.

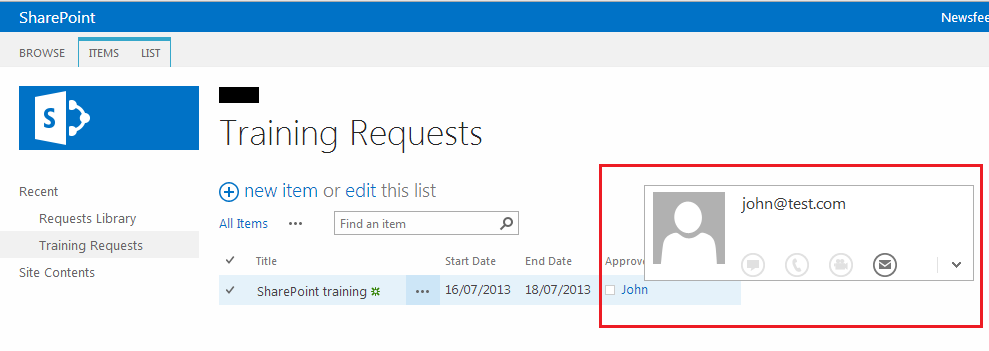
The corresponding link in a list with InfoPath List Form opens the New Item Form as you’d expect.

5. Person columns are not click-able in list views with Form Library

Person columns appear as normal text in list views with Form Library. This means you can’t click on the person name to view their profile in MySite, can’t get the user information summary callout when hovering over the name, and can’t get the user’s presence information.

The screenshot below is from a Form Library.

7 Person Column Form LibraryNow this one is from a list with InfoPath List Form.

8 Person Column List FormNote that there are workarounds for this, e.g. having a workflow on the library that runs on document updates, and set the value of a separate User field, and include this User field on the list instead of the one on the InfoPath form. This of course adds complexity to the solution.

6. Slower dev-debug cycles with Form Library

Form Library InfoPath forms can be deployed via feature activation from a custom solution, or by manually uploading the form to Central Admin, then activating the right feature from the target site collection. To deploy an updated form during development you will need to either redeploy the solution, or re-upload the form to Central Admin. It seems that either of these cause the app pool of the target site collection to recycle, and therefore add a few seconds to each dev-debug cycle (depending on how fast your dev machine is). In the long run this adds up and reduces your productivity.

With InfoPath List Form, during development you would publish the form to the target list using InfoPath Designer. This is very quick and does not cause the app pool to recycle.

7. Promoted fields cannot be referenced in Nintex Workflow for Form Library

Our project also involved Nintex Workflow 2013. The promoted fields cannot be referenced in Nintex’s Update Item activity. This means you cannot use Nintex Workflow to update these fields.

This is because the submitted form is stored as an XML document, and the promoted fields contain an XPATH expression to the appropriate elements in the XML document. This is why reading values from these promoted fields is OK, but updating them is a problem.

Note that this is not restricted only to Nintex. The same limitation exists for other code. For example, in a console app, I was able to read the values from the promoted fields but could not set them. I imagine that to set them, you will need to update the actual XML document. Consider this carefully, as even though it may not be an issue right now for your current requirements, it may be in the future.

With InfoPath List Form, because the submitted item is stored as a normal SharePoint list item, you do not have this limitation.

8. Able to use Connection Library for main data connection means easier deployment with Form Library

OK enough bad things about Form Library :).

With Form Library, InfoPath Designer allows you to convert the main data connection to a connection file. This file then can be uploaded to a Connection Library on the target site collection, or to Central Admin. This connection file defines the target library that the form instances will be submitted to. This means it is easier to promote the form through difference environments, as you just need to update the connection file to match the target environment.

With InfoPath List Form, the form is tied to the target list. InfoPath Designer does not allow you to convert the main data connection to a connection file. It also does not allow you to re-point the form to another list. This makes it difficult to migrate the form across environments. The only way I have found to re-point the form to another list is to manually edit the manifest of the InfoPath form. This works – and must be supported since it is posted on the official MS InfoPath team’s blog: http://blogs.msdn.com/b/infopath/archive/2004/05/04/126147.aspx :).

9. Able to promote Form Library forms across environments without InfoPath Designer

This is linked to the last point. You can deploy a Form Library form and its data connection file(s) and perform all the required hooks-up using features, and therefore do not require InfoPath Designer.

With InfoPath List Form, you will need to manually publish the form to the target list using InfoPath Designer (after modifying its manifest to suit the target environment). This increases the complexity of your deployment as it adds a manual step and InfoPath Designer as an additional prerequisite.

10. Form Library’s data schema is flexible and is not tied to list columns

This is one of the biggest advantages of Form Library. Because the submitted data is stored as an XML document with Form Library, the data structure is decoupled from the library’s columns. This means you can define any data structure to facilitate your form’s logic without impacting the columns of the library.

With InfoPath List Form, the data structure must map 1-to-1 to the list’s columns. Let say for example you have an Approver field on the form. You want a hyperlink on the form that will take users to the user profile of the specified approver. In InfoPath, you’d need a data field for this hyperlink control. With InfoPath List Form, this will require you to define a corresponding column in the list for this data field. This is not ideal, as this means introducing unnecessary columns to your list (and therefore content type) structure to facilitate your UI requirements.

This is the biggest indicator for when you should pick Form Library over List Form. If you require a complex data structure, e.g. repeating tables, then Form Library is the better choice.

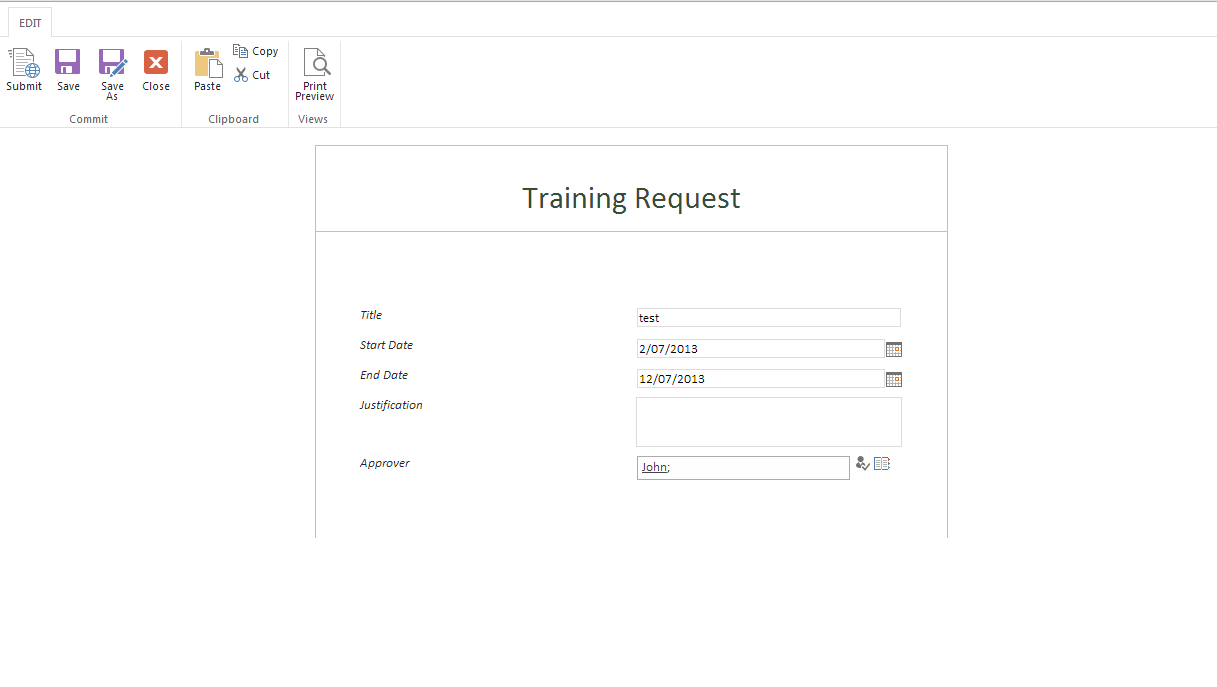
11. Separate Save and Submit actions with Form Library

Form Library has separate Save and Submit (and Save As as well) actions. The main advantage with this from my point of view is the ability to enable users to save a form with validation errors and resume with it at a later point in time before submitting. This is often a real business requirement, particularly for large forms.

This is not possible with InfoPath List Form without some messy and tedious validation logic.

12. Form Library has Print Preview

Form Library has a Print Preview button on the ribbon when a form instance is opened. This renders a slightly cleaner view of the form ready for printing.

There is no such button with InfoPath List Form.

Conclusion

So in conclusion there seems to be more advantages with InfoPath List Form. For forms with a complex data structure however, you may have to use Form Library.

Posted in InfoPath, SharePoint | 4 Comments