The OOTB Link to a Document content type is quite neat. It allows you to create a link to documents in other locations in your site. External links are also possible. The user experience is quite poor. The user either has to:
- Know the URL of the document they want to link to and type it into the text box, or
- First go to the location of the document, copy its URL, then go back to where they wanted to create the link, then paste the URL into the text box.
In this post I will provide a walkthough of a relatively simple solution you can implement to provide a Browse button on the form that creates the Link to a Document.
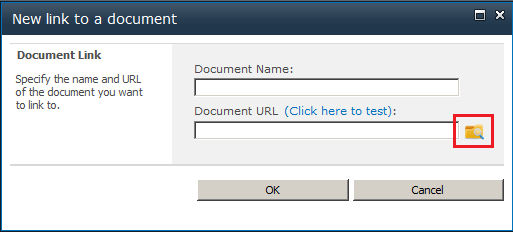
The user gets an icon to browse for the document they want to link to:
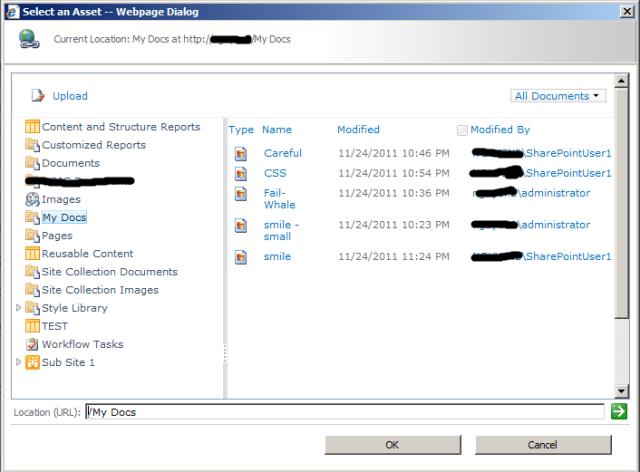
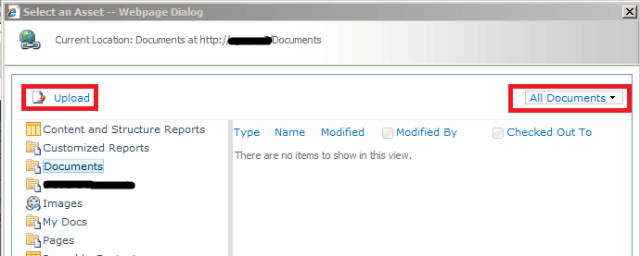
Clicking the browse icon brings up a dialog for browsing the site and selecting a document:
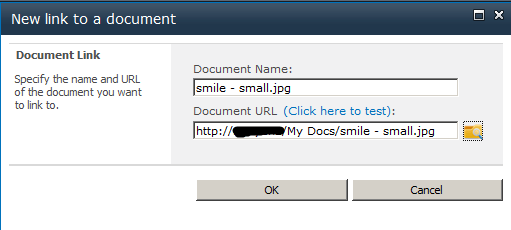
Double clicking on a document closes the dialog and populates the previous form with the name and URL of the selected document:
1. Create a custom template for the Link to a Document content type
The input form that you see when creating a new Link to a Document is actually the document template for that content type. Check the settings of the Link to a Document content type in SharePoint and you will see that it is set to /_layouts/NewLink.aspx.
We will create a clone of this page, NewLink.aspx, and add our browse icon to it. We will then configure the Link to a Document content type to use our new page as its document template.
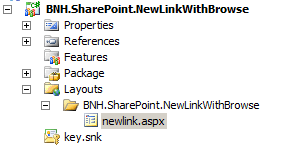
Create a new empty SharePoint project (mine is called BNH.SharePoint.NewLinkWithBrowse) and specify it to be farm solution. Add a SharePoint “Layouts” Mapped Folder to the project. Right click on the sub-folder underneath the Layouts folder and choose to add an Existing Item…. Browse to C:\Program Files\Common Files\Microsoft Shared\Web Server Extensions\14\TEMPLATE\LAYOUTS and select the Newlink.aspx file. This will add a copy of the NewLink.aspx file to our solution. Your solution should now look like this:
2. Configure Link to a Document to use the custom template
We will now configure the Link to a Document content type to use our custom template and test that things are still hanging together. Go ahead and deploy the solution. Then, go to your SharePoint site > Site Settings > Site Content Types > Link to a Document > Advanced settings > and change the Document Template to be /_layouts/BNH.SharePoint.NewLinkWithBrowse/NewLink.aspx.
Test to ensure that you can still create new Link to a Document items.
3. Add browse icon to document template
We will now customise the template we have just cloned. The dialog that comes up to allow the user to browse for a document to link to is actually an OOTB control, namely the AssetUrlSelector control. This control renders a button/image on the page. When clicked, this button/image launches a dialog that allows the user to browse the contents of the site. When a user selection is made, the control can either populates a text box with the URL of the selected document, or call a JavaScript callBack function.
See these links for more info on this control:
- http://msdn.microsoft.com/en-us/library/ms543215.aspx
- http://msdn.microsoft.com/en-us/library/microsoft.sharepoint.publishing.webcontrols.asseturlselector.aspx
Back in Visual Studio edit the Newlink.aspx page. Add the following tag registration to the page. This will allow us to reference the AssetUrlSelector control.
<Register TagPrefix="cms" Namespace="Microsoft.SharePoint.Publishing.WebControls"
Assembly="Microsoft.SharePoint.Publishing, Version=14.0.0.0, Culture=neutral, PublicKeyToken=71e9bce111e9429c" %>
Scroll down and search for the control with the following markup:
<wssawc:InputFormTextBox title="<%$Resources:wss,newlink_url%>" class="ms-input" ID="UrlInput" Columns="35" Runat="server" maxlength=255 width=300 />
This is the URL text box on the form. Add the following markup for our browse icon directly below the URL text box above:
<cms:AssetUrlSelector ID="assetUrlSelector" runat="server" AssetUrlTextBoxVisible="false" ButtonType="Image" PickerButtonImage="/_layouts/BNH.SharePoint.NewLinkWithBrowse/File-Explorer-32.png" ClientCallback="assetLinkSelected" />
In the above we have applied a number of settings for our AssetUrlSelector control, including:
- AssetUrlTextBoxVisible=”false” – The control by default has its own text box to display the URL of the selected document. We do not need this as we will be using the text boxes of the Link to a Document form.
- We have set the control to render an image rather than a button. We will later add the image file to our solution.
- ClientCallBack=”assetLinkSelected” – This is the important setting. This is a custom JavaScript that we will add in the next step. This script will be called to handle the user’s selection.
Search for the Content tag with ContentPlaceHolderID=”PlaceHolderAdditionalPageHead”. This tag contains a number of JavaScript functions. Add the following JavaScript as the last function to this tag:
function assetLinkSelected(newAssetUrl, newAssetText, configObject, returnValue) {
	/*If newAssetUrl is an internal SP URL, it will not contain the server path (i.e.
	the http://hostName:81 part). In this case we will need to append the server path to it
	for it to pass validation.

	If the newAssetUrl is an external URL, it will have the full absolute path and we won't have to touch it.
	*/
	var serverPath = "";
	var httpIndex = newAssetUrl.toLowerCase().indexOf("http://");
	var httpsIndex = newAssetUrl.toLowerCase().indexOf("https://");

	if (httpIndex == -1 && httpsIndex == -1)
	{
		//We want to get the http://hostName:81 part of the current location. window.location.origin
		//would give us this, but apparently it doesn't work on all browsers. To be sure we will just
		//construct the path from various parts of the current location.

		var currentLocation = window.location;

		serverPath = currentLocation.protocol + "//";
		serverPath += currentLocation.hostname;
		if (currentLocation.port != "" && currentLocation.port != null) {
			serverPath += ":" + currentLocation.port;
		}
	}
	var absoluteAssetUrl = serverPath + newAssetUrl;

	var inputTextBox = document.getElementById("ctl00_PlaceHolderMain_ctl01_ctl01_UrlInput");
	inputTextBox.value = absoluteAssetUrl;

	var nameInputTextBox = document.getElementById("ctl00_PlaceHolderMain_ctl01_ctl01_NameInput");
	nameInputTextBox.value = newAssetText;
}
The URL and descriptive text of the document selected by the user is passed to the JavaScript above as the first 2 arguments. Essentially in this function we retrieve the URL and Name text boxes of the create a Link to a Document form by their client ID, and then set their value to the URL and descriptive text provided to us by the AssetUrlSelector.
The only slightly tricky bit here is that the OOTB form requires the value in the URL text box to start with http:// or https://. The URL returned by the AssetUrlSelector however is server relative (i.e. do not have the http://hostName part). We therefore will need to append the http://hostName part to the URL value for it to pass validation.
The other thing is that the user could type an external URL into the AssetUrlSelector (e.g. http://www.google.com), in which case an absolute URL will be returned to our script and we won’t have to do anything.
Next, we will add an image to our solution that will be used as the browse icon. In Visual Studio right click on the sub-folder underneath the Layouts mapped folder and add an image of your choice (e.g. http://www.iconspedia.com/dload.php?up_id=94032). Remember to update the PickerButtonImage attribute of the AssetUrlSelector control in the markup of the Newlink.aspx file to match the image of your choice.
The last thing we’ll do is apply some minor styling code to the Newlink.aspx page. Search for the Content tag with ContentPlaceHolderID=”PlaceHolderMain”. Add the following CSS after the beginning of this tag:
<style>
	.ms-assetpicker-imagebutton
	{
		width: 20px;
	}
</style>
The above CSS will resize the image of the browse icon. Depending on the image you have chosen to use, this CSS may not be necessary.
The width of the URL (ID=”UrlInput”) and Name (ID=”NameInput”) text boxes on the page is set to 300. I have found that the browse icon wraps to the next line on some browsers with this setting. Change this to 260 to ensure that it does not wrap.
Go ahead and deploy your solution.
4. Bonuses
By using the AssetUrlSelector, you get these bonuses:
- The Upload button that allows the user to directly upload a document to a location, then create a link to it
- The View selector can be used to filter a location to find the document to link to
5. Download complete code
You can download the complete Visual Studio solution here: BNH.SharePoint.NewLinkWithBrowse.zip.
6. Other posts you may be interested in
Want to improve the user experience in SharePoint? Check out my other custom solutions here.

Bernado,
This is a great Post.
I’m new to sharepoint development and need to be able to link to file in a fileshare location.
How can I modify this to enable to user to browse network share and create a link to a file.
thanks
Sukh
Hi Sukh, that is going to be tricky. The only OOTB control that allows you to browse the local drives on the client machine is the ASP.NET File Upload control. From memory I recall that you can’t use JavaScript to query this control for the full path to the selected file – but I might be wrong. If that doesn’t work, you might have to look at building a custom SilverLight control.
Sukh were you ever able to accomplish this? i am looking to achieve the exact same thing….Please let me know!
Or Bernardo if you have come across a way to do this please let me know as well…
Bernado,
This is brilliant. Thanks for sharing.
What’s really frustrating is that such an elementary feature isn’t OOTB. Does Microsoft really think it’s OK for users to cut & paste a URL to link to a document?
Cheers,
Ben
Great post , It is very well defined. Many thanks.
Great post,
Just get one error with the hardcoded ids “ctl00_PlaceHolderMain_ctl01_ctl01_UrlInput” and “ctl00_PlaceHolderMain_ctl01_ctl01_NameInput”.
I just replaced it with “” and “”.
Then everything is working fine.
Thx
Hmmm strange.. didn’t spot that during my testing. Thanks for posting back the fix :).